Learning is never enough. But if you try to apply in practice what you want learning, it becomes a no-brainer for you.
What we can do for you today?
Our support experience tells you might have problems with inline translation on your magento website sometimes. Let’s clarify the issue.
There are some ways of translating words. If you have a lot of translation work you can start with using locale files. In a nutshell, find the app/locale and choose the language you need to translate to. Then by using the text editor please open the required csv file and set changes.
But if you need to make the instant language translations with only a few clicks, then you always have a choice. You can simply use the inline translation tool created by Magento. Once tried you will see a lot of benefits such as:
- you are allowed either to translate or edit the whole phrases
- you translate what you see
- you are allowed to make language change in selected store view
- no need to connect the ftp
That’s why we'd like to practice use this translation tool with you today.
How to enable inline translation feature?
First of all please make sure whether store views for different languages were created.
Let’s go…
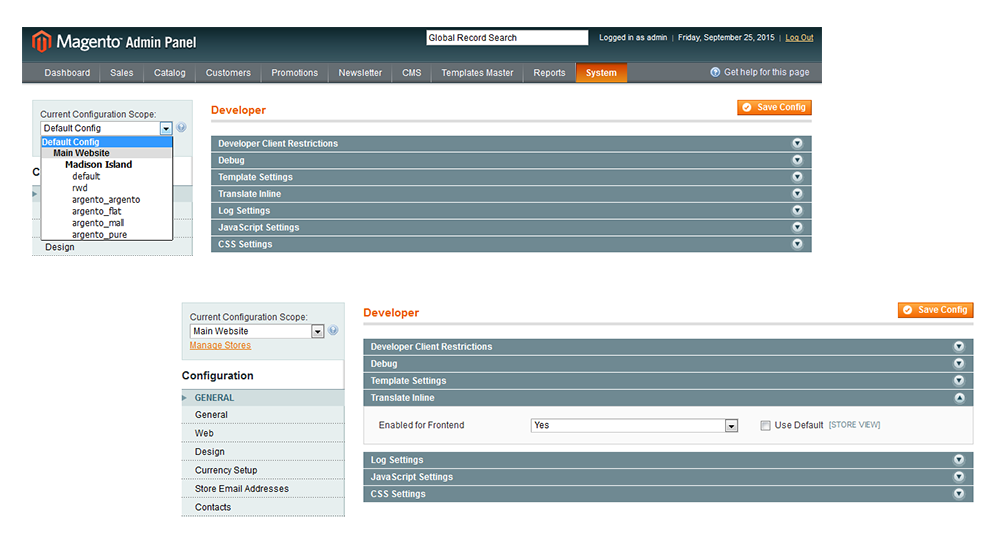
In your Admin Panel you have to navigate System>Configuration>Developer. Now you see the Current Configuration Scope drop-down at the left top corner of the page. The only one thing you need to do here is to choose the store view required to be translated.
Then move to Developer settings fieldset and look at Translate inline field. Please uncheck the Use default box and select Yes in the Enabled for Frontend field. Press Save.
How to make the process of translating invisible for store visitors?
In order to avoid highlighting words for translation on the frontend during the translation process, please continue changing settings in the backend. Navigate to the Developer Client Restrictions field in Developer fieldset. Uncheck the Use Website box and enter the IP address. In such a case all changes be visible for all visitors with the same developer IP address only. Your customers will see nothing but the results.
Done? Navigate to frontend. You have to choose the required language in the drop-down here. Now you can see words wrapped in red-dotted border. Need to translate? Keep on! When you are hovering over the word you can see a little book icon.
Click on that and you will see the popup. There are 3 steps left only:
- In the Custom field you have to input new inline translation text.
- Uncheck the Store View Specific box.
- Press Submit.
In order to see results, reload the page. Now you have it!
Some more tips on Inline Translation process:
- In order to make sure your changes are working well on live site, please clear Cache.
- If you need to check your translations, you can find them in database in shop_core_translate table.
- Apply the inline translation tool for the source strings not longer than 255 characters.
- You can bring in the table in case you change the server or upgrade Magento version.
What if the text is not surrounded by red border, but must be translated....
It's no trouble at all. You can easily get your own text by changing it in the backend. By analyzing the use cases we consider that it would be helpful for you to review the setting changes in footer, header, the About Us CMS page and also changes of the product and category titles.
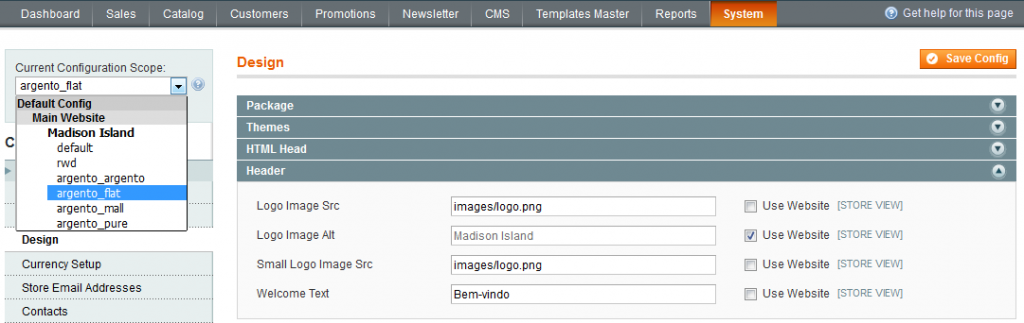
Let’s get start with welcome message which is placed in the header. You may wish to
invite your dear clients in their native language. Why not to become closer. So, navigate to Admin>System>Configuration. In the left configuration column you can find the Design tab. The following changes will be done in the Header fieldset. Please select the language store in the Current Configuration Scope dropdown in the top left corner of the page. Look at the Welcome Message field. Don’t forget to uncheck the Use Website. Now you can easily translate the welcome message according to your wishes. Click on Save Config.
You may agree that one of the most clickable web-page is About Us page. How to translate this page? It’s a snap. Please go Admin>CMS>Pages. If you need to keep the content unchanged for specific store, you have to choose an appropriate store and copy the URL key. Save the page. Then in the Manage Pages grid please click on Add New Page in the top right corner of the page.
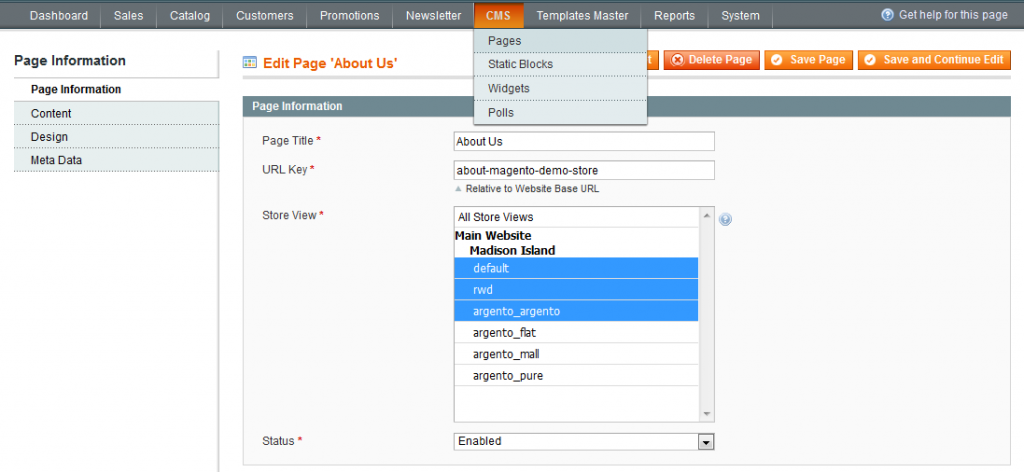
Now you have to paste the copied URL to the required field. Do you see the store in drop-down where the translated About Us text should be added? Please select that. The next changes will be done in the Content tab. The only one thing you have to do is to add the translated content text. Done? Good. Click the Save page.
- In order to translate the category title, please go Admin>Catalog>Manage
Categories. In the top left corner of the page please select the store you require in the Choose Store View drop down. Now specify the translated category name in the Name field. Click on Save category. - In order to translate the product title, please go Admin>Catalog>Manage Products. Click on the product you need to edit and continue changing. In the Choose Store View drop down select the required store. Now you can change titles in the Name, Description and Short description fields. Afterwards please save changes.
- Finally, you can translate with us the footer copyright. Let’s train with the expressing
the copyright notice in another language. Go Admin>System>Configuration>General>Design>Footer. Now you can see the Copyright field. Choose the language store in the Current Configuration Scope drop down. Done? In order to start entering the required information, please uncheck the Use Website box. Specify your own text and save changes.

That’s it. Hope, you enjoy practicing with us. If you have ever met any other difficulties with inline translation, please let us know. We are always pleased to get your comments in order to assist you.