Sold Together Products user manual
CONTENTS
3. General configurable options
Using code for changing location of Sold Together block with layout XML file
Placing blocks with related products in the shopping cart Ajax Pro 3.0
Adding blocks to the email after the order has been submitted
Description
Magento Sold Together Pro extension is effective solution to increase your customer satisfaction by suggesting related items to enhance the product and user experience. The basis for creating the module formed cross-selling strategy, that is incredibly effective for increasing revenue.Using the module, you allow buyers to find out the info they need on additional purchases without navigating away from the original product, that they've already chosen. Seeing items, that are well-connected to their original choice, customers would have a sincere interest in everything else, that you store page will offer to buy together. Such recommendations help shoppers feel better with available products, keep browsing your store, increase conversion rate, draw long-tail search traffic and also it's simplest method to add community features to store.
Positively Sold Together Pro will help you:
- Increase average total purchase amounts
- Increase awareness about the depth of your product offering
- Keeps visitors browsing at your store
- Help your customers to select accessories and related products
- Utilize placed order statistic info in order to suggest better products sets.
Installation
Thank you for downloading our magento extension. Please follow these instructions to proceed with the installation of your theme:Turn store compilation off
Navigate to Admin -> Tools -> Compilation and deactivate compilation mode for your store.Copy all files into your magento directory
Simply copy all files from "extension source x.x.x" directory into your magento store directory.In case you have different then "default" default folder - rename folders app/design/frontend/default/default and skin/frontend/default/default.Turn your magento cache off
Navigate to Admin -> System -> Manage Cache and deactivate cache for your store.Refresh your admin user access rights
Simply logout from your store admin and then login back.Next steps
- Login to your store admin and log out.
- Navigate to System > Configuration > Templates-Master > Sold Together Pro and enable extension for any store you need.
- Configure Sold Together Pro module according to your needs.
General configurable options
To set the configuration of Sold Together Pro extension, please go to Admin>System>Configuration>Sold Together Pro.
Enabled tab
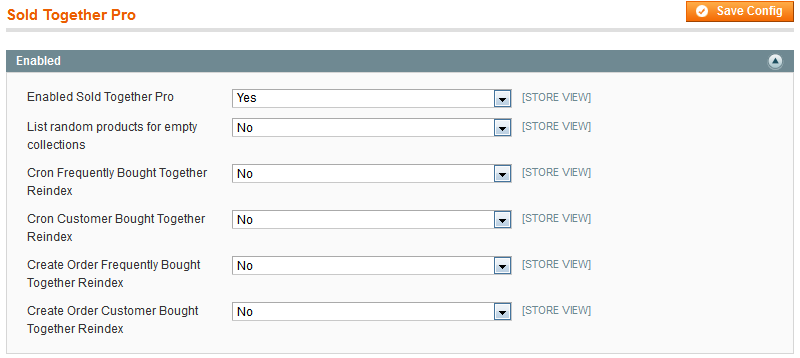
- Select Yes to enable Sold Together Pro extension.
- Select Yes to enable random products to be displayed on the page. You can use it if there are no orders placed at your store.
- Select Yes to enable reindexation cron for Frequently Bought Together index.
- Select Yes to enable reindexation cron for Customer Bought Together index.
- Select Yes to enable reindexation related products at Frequently Bought Together index after customer’s order creation.
- Select Yes to enable reindexation related products at Customers Bought Together index after customer’s order creation.
Please notice, that mentioned above settings are suitable for different stores. In order to choose the best solution for your store, please follow our recommendations. If your store is new, we recommend you to turn off cron and select Yes in the Create Order Reindex fields. That will create new products links right after your customers placed orders. If you are an owner of long-standing store with large amount of orders, you’d better run manual reindex in Sold Together admin interface. Then please turn off cron and select Yes in the Create Order Reindex fields. Cron reindex feature is recommended for stores with small catalogs.
Frequently Bought Together tab
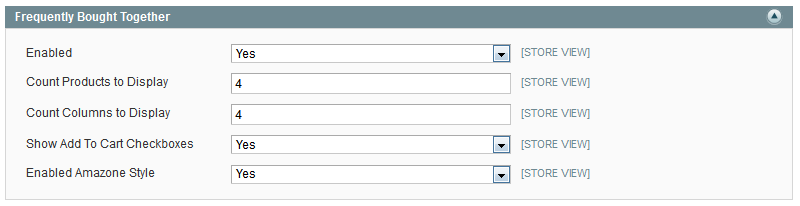
- Select Yes in the Enabled field to enable Frequently Bought Together block on products page.
- In the Count Products to Display please specify the number of products to be displayed on the shopping cart page.
- In the Count Columns to Display field specify the number of columns for products to be displayed.
- Select Yes to enable Add to Cart Checkboxes in the Frequently Bought Together block.
- Select Yes to enable Amazon style for Frequently Bought Together block.
Customer Bought Together tab

- Select Yes to enable Customer Bought Together block.
- In the Count Products to Display please specify the number of products to be displayed on the shopping cart page.
- In the Count Columns to Display field specify the number of columns for products to be displayed.
- Select Yes to enable Add to Cart Checkboxes in the Customers Bought Together block.
Suggest page tab
Our extension comes together with Suggest page module, that allows to show related and linked products right after customer added product to cart.

- Select Yes to display Frequently Bought Together block on suggest page after adding the product to shopping cart.

- Select Yes to display Customers Bought Together block on suggest page after adding the product to shopping cart.
Admin interfaces
Templates-Master offers to use two types of Sold Together blocks. First one is called Frequently Bought Together and manages products that were bought in the same order. And second one is called Customers Who Bought Also Bought. It manages products that were bought by the same customer.To configure interfaces of both types, please go to Admin>Templates-Master>Sold Together.
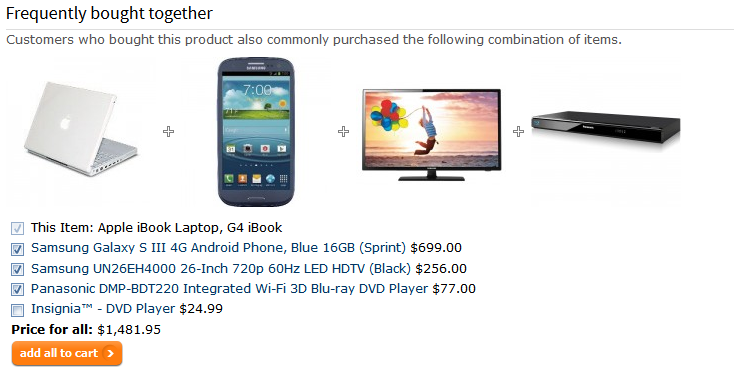
Adding related products to Frequently Bought Together
After you select Frequently Bought Together, you will be able to configure the block about related items to product ,that the customers have already chosen. It is kind of bonus for customers, whom will be prompted to buy an extra item for convenient use of their selected product. Please notice, that after initial extension installation there will not links between products.
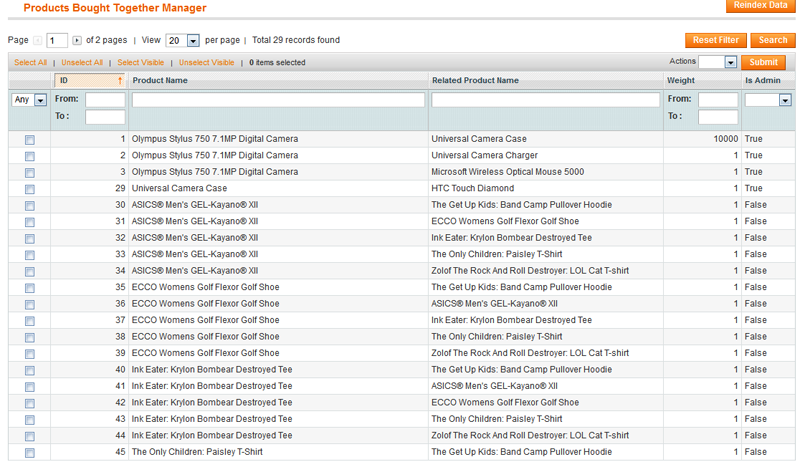


- On the product information tab click Frequently Bought Together. You will see new grid.
- Select Any from drop down list at the left top of the grid. Press Search button. Now you are able to mark products to be offered to customers buy together with original product.

- Please check related products and click Save.
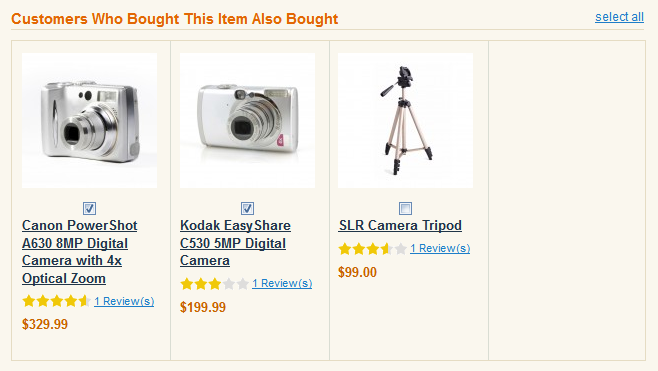
Adding related products to Customers Who Bought This Item Also Bought block
We recommend to create this block using natural customer behaviour and cross selling products list on existing orders history. Quite logical that buyers will listen to customers with similar tastes, that finally will lead to additional items purchase.
Please go to Admin>Templates-Master>Sold Together>Customers Who Bought This Item Also Bought. To add related products to Customers Who Bought This Item Also Bought block, please follow the same steps as in the description above.
Use cases
Using code for changing location of Sold Together block with layout XML file
In order to change, please connect to FTP server and find Magento files.Then follow the App>design>frontend>base>default>layout>tm>sold together.xml. Open file to be edited. Search <catalog_product_view> branch and make changes in reference name.
<catalog_product_view>
    <reference name="content">
        <block type="soldtogether/order" name="product.info.soldtogetherorder" before="-">
            <action method="setTemplate" ifconfig="soldtogether/general/enabled"><template>tm/soldtogether/order.phtml</template></action>
        </block>
        <block type="soldtogether/customer" name="product.info.soldtogethercustomer" after="product.info.soldtogetherorder">
            <action method="setTemplate" ifconfig="soldtogether/general/enabled"><template>tm/soldtogether/customer.phtml</template></action>
        </block>
    </reference>
</catalog_product_view>
Using code in phtml file to display Sold Together block
Please apply the following code in phtml file on the product page.
<?php echo $this->getLayout()->createBlock('soldtogether/order')->setTemplate('tm/soldtogether/order.phtml')->toHtml(); ?>
Placing blocks with related products in the shopping cart Ajax Pro 3.0
Please go to Admin>System>Configuration>AjaxPro and follow next steps:

- In the Enable field select Yes.
- In the Enable message window select Yes.
- In the Add to cart dialog window type select Suggest page content from drop down list.
Adding blocks to the email after the order has been submitted
If you are using Magento 1.9.2.2 version or later, you could add Sold Together blocks to the confirmation email about new order submission.
Before actions mentioned below, please check the soldtogether/email_customer and soldtogether/email_order block at System> Permissions>Blocks page. If you don't see this block in the grid, you have to add it manually by using the Add New Block button.
Next steps to follow:
- Go System>Transactional Emails and click Add New Template button at the right top corner of the page. Look at Load Default template fieldset. In the Template drop down please select the New Order value. Specify your Locale. Press Load Template button.
- You can see the whole code of template content. In order to add block with cross-selling products, please place the following code anywhere you want :
{{block type='soldtogether/email_customer' area='frontend' order=$order}} {{block type='soldtogether/email_order' area='frontend' order=$order}} - Specify the name for the template and save.
- Go System>Configuration>Sales Emails and look at Order fieldset. In New Order confirmation template drop down please select the template you've created before and save.
Note When you create a confirmation email for quest, you have to select the New Order For Guest value in step#1. Within the step #4 please make changes in the New Order Confirmation Template For Guest field.
Support
Template Master team is always ready to assist you with any issue related to our products.
We do offer:
- Free commercial products installation services
- Free updates within offered support period
- 3 months of free guaranteed support
Our duties:
- Responsibility for resolving products bugs.
- Help with technical queries.
- Support of popular web browsers (Firefox, Chrome, Safari, Internet Explorer 7+).
- Technical support in installation and usage of our products.
Common questions and ideas
Come up with new ideas!
Questions:
-
0voteA: Unfortunately there is not such option in extension settings. You can remove all related products that are not from product's category in "Edit product interface".Posted by on Tuesday, February 20, 2018
-
0voteA: Current release doesn't have that feature but we are planning to add it in next extension releases.Posted by on Friday, June 26, 2015