Navigation Pro User Manual
CONTENTS
3. General configurable options
- #1 Create vertical accordion menu in right column
- #2 Create vertical drop-down menu in left column
- #3 Create vertical drop down menu in left column with additional product output
- #4 Create horizontal dropdown menu with more additional columns
- #5 Create horizontal dropdown menu with more additional columns which can hold widgets
- #6 Create horizontal dropdown menu with html content
- #7 Create horizontal dropdown menu with html form
- #8 Create horizontal dropdown menu with additional cms links
- #9 How to hide category from particular categories tree
- #10 How to add home and contacts links to the top navigation block
Description
The Navigation Pro module is the most powerful Magento navigation solution available on the market. It has been created to improve the navigation capabilities of your magento powered store.
The extension will help you :
- quickly change look and structure of your store without hiring developers
- get to the direct access to the navigation features and settings
- simplify store navigation update process
- direct your customers to the page you want
With proper navigation structure users can successfully deal with categories of products that will increase sales in your store.
Using the most popular navigation types you can change design settings via admin interfaces and do the following :
With Navigation Pro you can easily do:
Set the look of categories with a lot of columns and show products using widget.
Change the default Magento menu by disabling any of categories for current tree and not affecting visibility of that category in other trees.
Insert additional links such as home or other cms pages on the same level with the same categories placed.

Place texts, banners or widgets you need above and below the drop-down.
Display several subcategories per one drop-down.
Set an unlimited number of sub-columns with the right information blocks.
Configure the number and width of sub-columns.

Installation
Turn store compilation off:
Navigate to Admin -> Tools -> Compilation and deactivate compilation mode for your store.
Copy all files into your magento directory:
Simply copy all files from "extension source x.x.x" directory into your magento store directory.
In case you have different then "default" default folder - rename folders app/design/frontend/default/default and skin/frontend/default/default.
Turn your magento cache off:
Navigate to Admin -> System -> Manage Cache and deactivate cache for your store.
Next steps
- Navigate to System > Configuration > Templates-Master > Navigation Pro and enable extension for any store you need.
- Go to Admin > Templates Master > Navigation Pro and configure your store navigation tree according to your needs.
- Modify navigation pro.css if you need to change overall look of menu items.
- That's all. Navigate to your home page and check how your store looks.
General configurable options
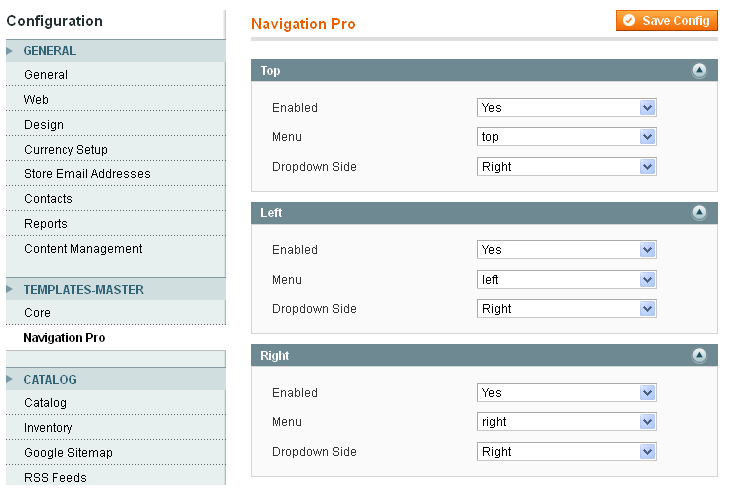
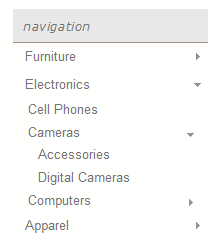
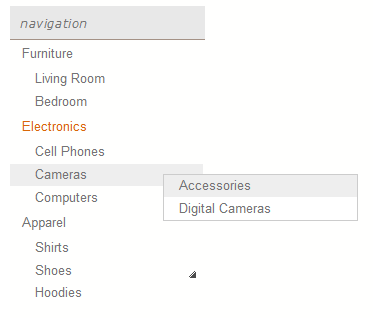
There are 3 predefined position to show navigation tree in extension configuration. Left and right blocks will be shown at the top position of side columns at all store pages. Top navigation block will replace default magento navigation block.
- Enabled - enable or disable navigation block
- Menu - one of existing navigation tree can be assigned to each navigation placeholder. Navigation trees can be created or modified at admin > Templates Master > Navigation Pro. There is no limit on overall number of categories trees. Also additional trees can be placed at any place of layout with xml code.
- Drop-down side - Set position to show dropdown at
Admin interfaces
The Magento extension Navigation Pro allows you to get full control over your store navigation.
Navigation menu settings
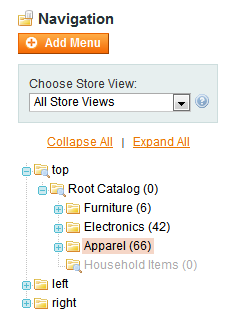
Categories tree in left column allows to create new navigations tree, switch to different store views and control exact look of navigation for each category.
General Information
Allows to set design settings for current category
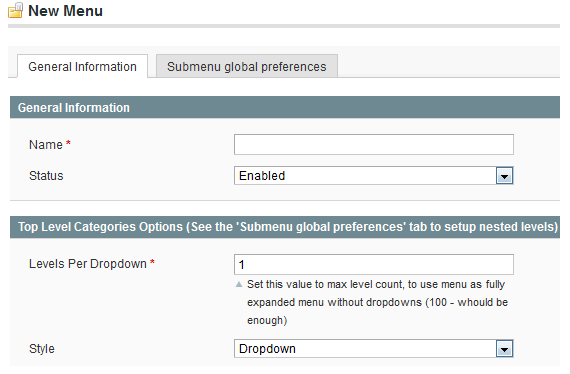
- Name - allows you to change or set for navigation menu item
- Status - allows you to disable or enable menu items
- Level per drop-down - allows you to set number of child categories to be shown at the same time
- Style - allows you to select either accordion or drop-down menu style
Sub-menu global preferences
Allows to set main design settings for all child categories
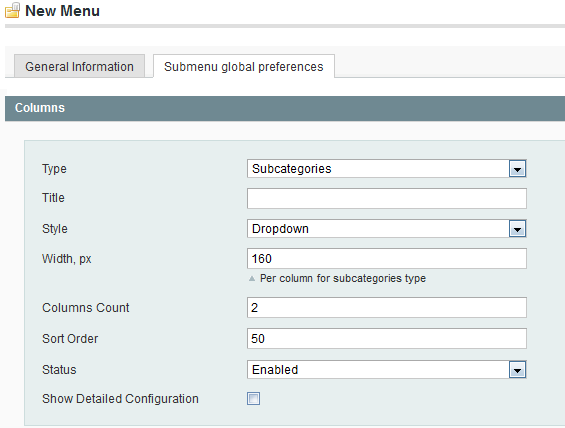
- Type - allows you to select type of content to be shown. Possible values Subcategories or Widget or Plain HTMl.
- Title - allows you to display the title for current menu
- Style - allows you to choose the display style of the sub-menu items.Possible values: drop-down or accordion style.
- Width, px - (Per column for subcategories type) - allows you to set the width of columns for subcategories type.
- Columns Count - allows you to select the number of columns used to display subcategories.
- Sort Order - allows you to regulate the sort order for the columns.
- Status - allows to enable or disable current menu item.

- Show Detailed Configuration - allows to configure design settings in more details.
- Levels Per Drop-down - allows you to set the number of subcategories levels per drop-down.
- Css Id , classes and style - allows you customise menu with external or inline styles and even assign custom styles to them.
Categories menu settings
These settings define what categories are shown on top, right or level store views.
General information
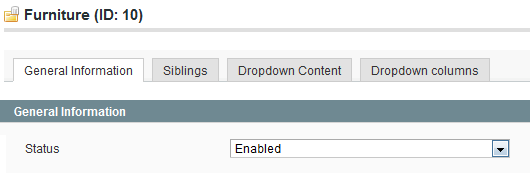
- Status - allows you to enable or disable this menu item
Siblings (you can add or not according to your wishes)
Siblings is additional menu setting which display blocks with right information on both sides of menu and submenu items.This interface can be used for creating new drop-down menus.

- Content - allows you to edit the content of siblings
- Drop-down content- allows you to edit the drop-down siblings’ content
- Sort order - allows you to regulate the sort order for siblings’ columns.
- Status - allows you to enable or disable availability of siblings
- Drop-down Css styles - allows you to set drop-down style according to your needs.
Drop-down content
The interface “drop-down content “ allows you to place custom content at the bottom and top part of drop-down window. You can set banners , video and custom product listings there.

- Drop-down top content - allows you to edit the content to be shown in the top part drop-down window.
- Drop-down bottom content-allows you to edit the content to be shown in the bottom part of drop-down window..
Drop-down columns
Using this interface you may create columns with any type of content. You select the mode “Custom” and then you completely control the creation process by yourself.
-
Mode - allows to choose the mode using the menu. Possible modes are the following:
- Use Root Menu Preferences - by selecting this way drop-down columns will be taken from the menu where the category is edited
- Use Parent Menu Preferences - by selecting this way drop-down columns will be taken from the current category menu
- Custom - by selecting this way you may set drop-down columns by yourself
Use cases
To get started find a menu you like , you should go to Magento Admin > templates master > Navigation pro. This will take you to our settings when you can customise the look and structure of your own menu.
Create menu , using one of the following ways :
#1 Create vertical accordion menu in right column
Assign right navigation tree to right navigation block at Magento Admin > templates master > Navigation pro
Open right navigation tree and apply the following settings:
At general information tab
- level per dropdown - 1
- style - accordion
At submenu global preferences
- type - subcategories
- width - 190px
- style - accordion
- columns count - 1
That’s all. Please go now to your store frontend and check is accordion menu in right column working right.
#2 Create vertical drop-down menu in left column
Assign left navigation tree to left navigation block at Magento Admin > templates master > Navigation pro
Open left navigation tree and apply the following settings:
At general information tab
- levels per drop-down - 2
- style - drop-down
At submenu global preferences
- type - subcategories
- style - drop-down
- width - 193 px
- columns count - 1
That’s all. Please go now to your store frontend and check is drop-down menu in left column working right.
#3 Create vertical drop down menu in left column with additional product output

Assign left navigation tree to leftnavigation block at Magento Admin > templates master > Navigation pro
Open left navigation tree. Select Expand all. Then left > Electronics > computers.
Apply the following settings:
At general information tab
- Status - enabled
- No siblings
At drop-down content
- drop-down top content - you may insert a link to the banner if you want
- drop-down bottom content - you may insert a link to the banner if you want
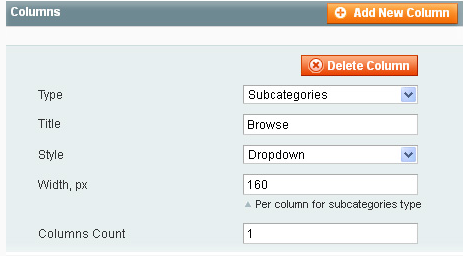
At drop-down columns
- type - subcategories
- title - browse
- style - drop-down
- width - 160px
- columns count - 1
- sort order - 10
(these setting you can see on the left side)
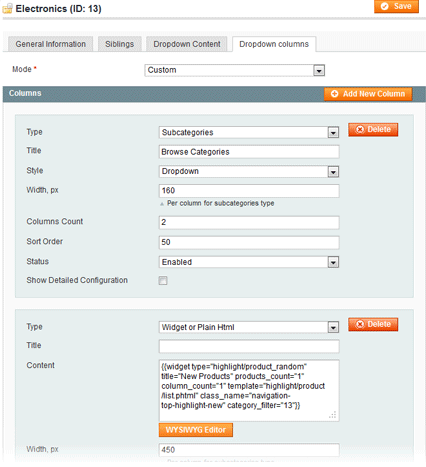
- type - Widget or Plain HTML
-
content - setting here provides the output of additional product. Your steps are:
- Click on WYSIWYG editor
- Click on “insert widget type” button
- Select widget you want to use
- Configure according to your needs
- width , px - 460
- sort order - 50
(these settings you can see on the right side)
That’s all. Please go now to your store frontend and check whether the additional product is visible.
#4 Create horizontal dropdown menu with more additional columns
Assign top navigation tree to top navigation block at Magento Admin > templates master > Navigation pro
- Open top navigation tree.
- Select Expand all.
- Then go to the category you want to modify and click on Drop-down columns tab.
- Select the mode “Custom” and add a new column.
Apply the following settings :
- Set type - Subcategories
- Set style - drop-down
- At width , px - set width more or less dependent on what size you want the column to be
- At columns count - two or more dependent on how much columns you want to create.
- At sort order - set order for your new column. Use value below 0 to add the widget before the your first column or value above 0 to add the widget after the one.
That’s all. Please go now to your store frontend and check whether many columns drop.
#5 Create horizontal dropdown menu with more additional columns which can hold widgets

Assign top navigation tree to top navigation block at Magento Admin > templates master > Navigation pro
- Open top navigation tree.
- Select Expand all.
- Then go to the category you want to modify and click on Drop-down columns tab.
- Select the mode “Custom” and add a new column.
The following steps are :
- At type - change to Widget or Plain HTML
At content :
- Click on WYSIWYG editor.
- Click on “insert widget type” button.
- Select widget you want to use.
- Configure according to your needs.
- At width , px - set width more or less dependent on what size you want the content to place there.
- At sort Order - set order for your new column. Use value below 0 to add the widget before the your first column or value above 0 to add the widget after the one.
That’s all. Please go now to your store frontend and look whether the widget is visible.
#6 Create horizontal dropdown menu with html content
Assign top navigation tree to top navigation block at Magento Admin > templates master > Navigation pro
- Open top navigation tree.
- Select Expand all.
- Then go to the category you want to modify and click on Drop-down content tab.
The following steps are :
- Click on WYSIWYG editor.
- Click on “insert widget type” or “insert variable “button.
- Select the HTML content you want to use.
- Configure according to your needs.
That’s all. Go now to your store frontend and look whether the information is visible.
#7 Create horizontal dropdown menu with html form

Assign top navigation tree to top navigation block at Magento Admin > templates master > Navigation pro
Created using siblings settings.
- Open top navigation tree.
- Select Expand all.
- Then top > Apparel.
Select Siblings and look the sample of content “Contact us”.You should do the following :
- At drop-down content
- Click on WYSIWYG editor
-
Input HTML code of form you you want to place there. For example you can put
{{block type="core/template" name="contactForm" template="contacts/form.phtml"}} - Set sort order - 60
- Set status - enabled
- At drop-down css styles - width: 555px; padding: 12px 20px 18px
That’s all. Please go now to your store frontend and check your selected settings.
#8 Create horizontal dropdown menu with additional cms links
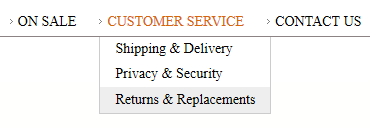
Created using sibling settings.
- Open top navigation tree.
- Select Expand all.
- Then top > Apparel.
- Select Siblings and look the sample of content “Shop by brands” or “Customer Service” You should do the following :
At drop-down content
- Click on WYSIWYG editor
-
Input form HTML code you want to place there. For example at our demo server next code was used.
  <ul class="level1 nav-ul nav-row" style="width: 170px;">
    <li class="level1 nav-li first">
      <a class="nav-a relative-level1 nav-a-level1" href="https://templates-master.com/""/customer-service#answer1">
        <span class="nav-span">
          Shipping & Delivery
        </span>
      </a>
    </li>
    <li class="level1 nav-li">
      <a class="nav-a relative-level1 nav-a-level1" href="https://templates-master.com/""/customer-service#answer2">
        <span class="nav-span">
          Privacy & Security
        </span>
      </a>
    </li>
    <li class="level1 nav-li last">
      <a class="nav-a relative-level1 nav-a-level1" href="https://templates-master.com/""/customer-service#answer3">
        <span class="nav-span">
          Returns & Replacements
        </span>
      </a>
    </li>
</ul> - Set sort order - 35
- Set status - enabled
That’s all. Please go now to your store frontend and check your selected settings.
#9 How to hide category from particular categories tree
- Open top , right or left navigation tree dependent on that exactly which block you want to hide a category.
- Select Expand all.
- Select category you want to hide from selected navigation tree
- Then at General information tab you should change the status of selected category to “disabled”.
#10 How to add home and contacts links to the top navigation block
Home navigation link can be created using siblings settings.
- Open top navigation tree.
- Click on Expand all.
- Then select top categories tree and click on first category there.
- Select Siblings and apply the following settings:
At content your steps are:
- Click on WYSIWYG editor
- Submit link to Home page you are offered
- At sort order you should select the value -5. Use value below 0 to add home link before the product category or value above 0 to add the link after the one.
- Set status - enabled
- At drop-down css styles you can set the column width.
That’s all. Please go now to your store frontend and check whether there is the Home page.
Go through each level , apply different settings and customize whatever you can until you will be satisfied with the result.
Support
Template Master team is always ready to assist you with any issue related to our products.
We do offer:
- Free commercial products installation services
- Free updates within offered support period
- 3 months of free guaranteed support
Our duties:
- Responsibility for resolving products bugs.
- Help with technical queries.
- Support of popular web browsers (Firefox, Chrome, Safari, Internet Explorer 7+).
- Technical support in installation and usage of our products.
Troubleshooting:
You can follow the product questions and read frequently asked questions from users.
If you have any problems with extension installation please contact us at helpdesk
Common questions and ideas
Come up with new ideas!
There are no product questions yet.