Magento Newsletter Booster extension user manuall
CONTENTS
3. General configurable options
5. Examples of using Newsletter Booster
Creating customer segment for customers who bought products from category
Creating customer segment for customers who bought products from brand
Sending newsletter campaigns to different groups of subscribers
Description
The Newsletter Booster extension is an effective way to increase a number of potential clients without spending a lot of money. By using our module you can create customer segments, add newsletter campaigns and direct the newsletters to customers with guaranteed feedback. With proper email marketing you will be able to engage customers, gain customer’s loyalty and control your store sales.Newsletter booster will help you:
- send newsletter campaigns to three separate user type groups based on different subscription source
- manage your newsletter campaigns
- track and analyze your newsletters performance
- create nice looking newsletters
- create customers segments based on history of customer orders, geographical parameters and much more
- increase your newsletter efficiency by targeting specific customers segments.
Magento Newsletter Booster extension comes with clear and fully customizable interface. It will allow you to:
- Send emails via Mandrill, SMTP or sendmail
- separate html/txt content for emails and make the convertion html content to html available
- track your newsletter performance with Google Analytics
- send newsletters with cron
- find out how many customers opened your newsletter or clicked link
- send test emails before sending campaigns
- send campaign test email via ajax
- send emails with multiple threads up to 10, that will speed up sending of emails
- support magento variables and magento widgets
- support multiple email templates
- preview the content during the creation of the campaign template
- provides unsubscribe emails feature
- doesn't affect Magento core files.
Basic terms
The Newsletter Booster extension consists of two tightly integrated modules - Segmentation Suite and Newsletter Booster.Customer segment - it is a group of customers who share one or more attributes that are associated with marketing operations.
Newsletter Campaign- is an email campaign containing a newsletter sent to your customers.
Our extension allows you to send newsletter campaigns to different subscribers' groups separately. All recipients are grouped in the following way:
- Magento Subscribers - are default magento customers subscribed to the newsletter.
- Newsletter Booster subscribers - are users subscribed to the newsletter with Newsletter Booster’s features implementation.
- Segment Customers - are users categorised according to the created customer segment.
Installation
Thank you for downloading our magento extension. Please follow these instructions to proceed with the installation of your theme.Turn store compilation off
Navigate to Admin -> Tools -> Compilation and deactivate compilation mode for your store.Copy all files into your magento directory
Simply copy all files from "extension source x.x.x" directory into your magento store directory. In case you have different then "default" default folder - rename folders app/design/frontend/default/default and skin/frontend/default/default.Turn your magento cache off
Navigate to Admin -> System -> Manage Cache and deactivate cache for your store.Refresh your admin user access rights
Simply logout from your store admin and then login back.Next steps:
- Navigate to System > Configuration > Templates-Master > Newsletter Booster and enable extension. Please set number of emails sent per cron iteration at "Number of emails sent per cron iteration" field. You can also enter your Mandrill API info there and configure Google Geo Map feature for your statistic interface
- Navigate to System > Configuration > Templates-Master > Segmentation Suiter and enable extension.
- Navigate to System > Templates-Master > Segmentation Suiter and create your first customers segment.
- Navigate to System > Templates-Master > Newsletter Booster > Campaigns and create your first customers segment.
General configurable options
In order to configure both extensions, please go Magento Admin>Configuration>System.Segmentation Suite

Newsletter Booster
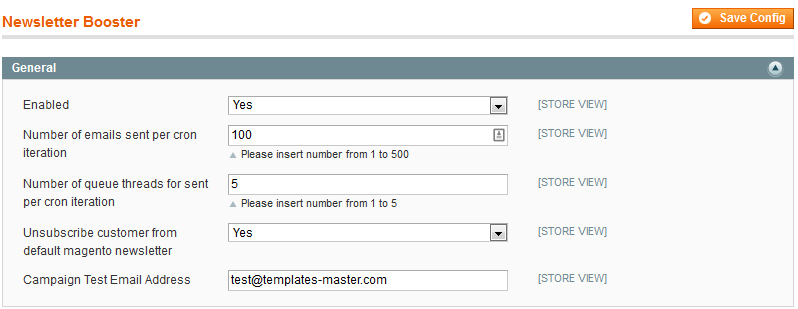
- Enable the Newsletter Booster module by selecting Yes in the Enabled field.
- Specify the number of emails sent per cron iteration in the Number of emails sent per cron iteration field.
- Specify the number of queue threads sent per cron iteration in the Number of queue threads for sent per cron iteration field.
- Select Yes in order to unsubscribe customer from the default magento newsletter in the Unsubscribe customers from default magento newsletter field.
- Specify the email address for testing only in the Campaign Test Email Address field.

- Allow customers to subscribe right on the store page by selecting Yes in the Show Frontend Subscribe Form field.
- Allow non registered users to subscribe by selecting Yes in the Guest subscribe field.
- Select Yes in Send a confirmation email when the customer subscribes field in order to get confirmation email about customer subscription.
- Enable the Mandrill App Service by selecting Yes in the Enabled field.
- Specify the key that you have got from Mandrill Api Service in the Api Key field.
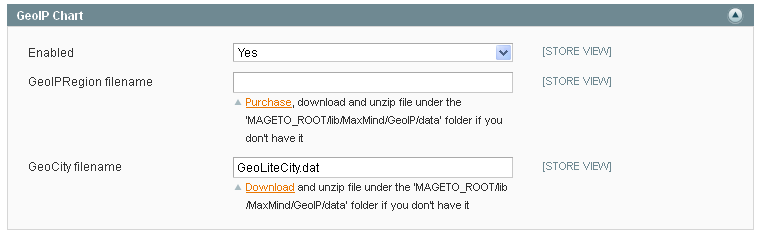
- Enable the display of Region and City Detection fields by selecting Yes in the Enabled field.
- Purchase, download and unzip file under the 'MAGETO_ROOT/lib/MaxMind/GeoIP/data' folder if you don't have it. Set .dat file in the GeoIPRegion filename field.
- Download and unzip file under the 'MAGETO_ROOT/lib/MaxMind/GeoIP/data' folder if you don't have it. Set .dat file in the GeoCity filename field.
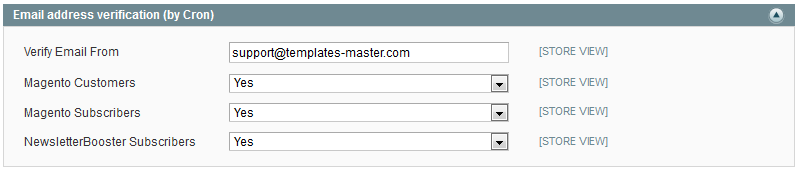
- Specify the email which will be used for testing in the Verify Email Form field. This address will be requested by email server.
- By selecting Yes in Magento Customers field you will allow the verification of magento customers emails.
- By selecting Yes in Magento Subscribers field you will allow the verification of magento subscribers emails.
- By selecting Yes in NewsletterBooster Subscribers field you will allow the verification of Newsletter Booster subscribers emails.
Admin interfaces
Proper email marketing involves some required steps listed below. We recommend you follow them in order to make your newsletter emailing efficient.
Managing customer segments
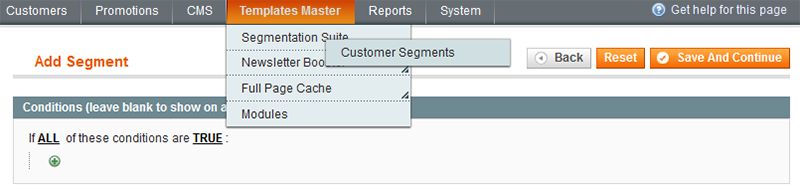
Go Magento Admin>Templates Master>Segmentation Suite>Customer Segment and create Segment.
Now you are allowed to divide and identify customers according to the product, personal customer data or service needs.
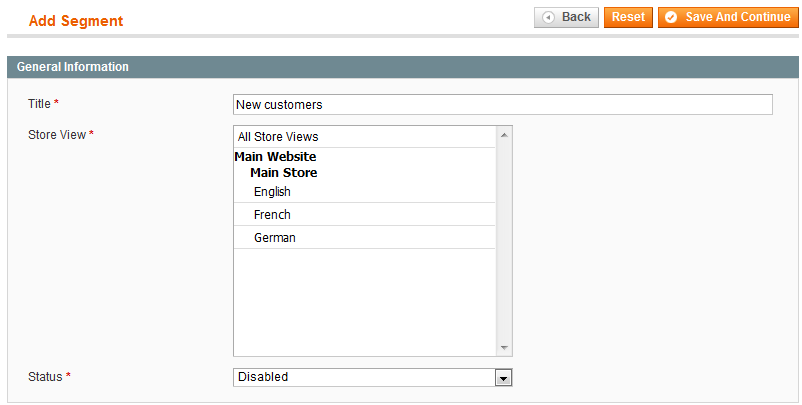
- Specify the new segment title in the Title field.
- Select the store where the segment will be active in the Store View drop-down.
- Enable the newly created segment by selecting Yes in the Status field.
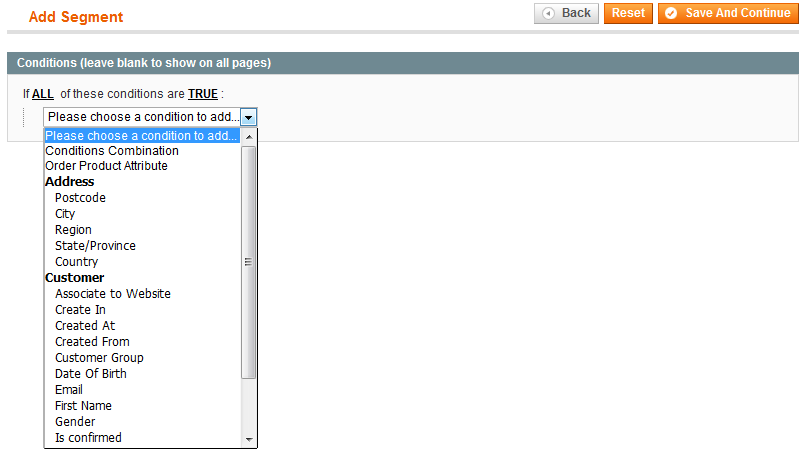
Please choose conditions which will be used for filtering customers.
Afterwards you can use the Segment customers tab grid in order to look over customers that match the parameters of segment.
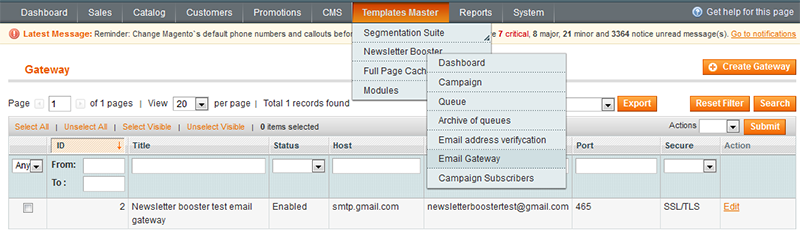
Creating Email Gateway
If you commonly use Mandrill App or other mail services for sending emails, please go to the next item. If not and you want to create third-party mail gateway, please go Magento Admin>Templates Master>Newsletter Booster>Email Gateway.
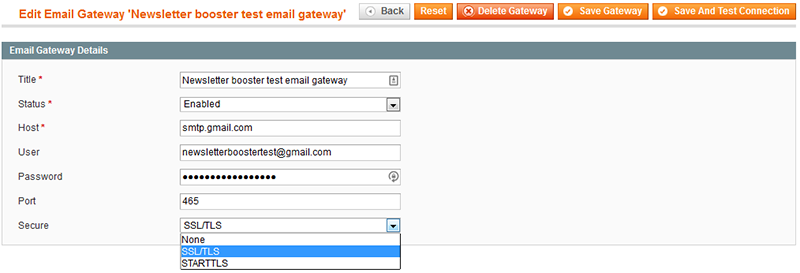
- Specify the name of new gateway in the Title field.
- Enable current gateway by selecting Yes in the Status field.
- Enter the name of your mail server in the Host field.
- Specify user’s name or email address for authorization in the User field.
- Enter the user’s password in the Password field. Please notice that this field is not required. An anonymous email gateway can be also created.
- Specify the port, that will be used to access your mail server, in the Port field.
- Select types of secure from drop-down list. Possible values are None, SSL\TLS and STARTTLS.
Creating Campaign
The extension comes with detailed process of campaign creation. In case of proper campaign customization you would easily attract new subscribers, send them affecting email newsletters and subsequently get excellent reports on the results. Keep in mind, that the extension allows to send campaigns to three separate subscriber types mentioned in Basic terms.
Now please go Magento Admin>Templates Master>Newsletter Booster>Campaigns and create a new Campaign. You will be allowed to create multiple campaigns.
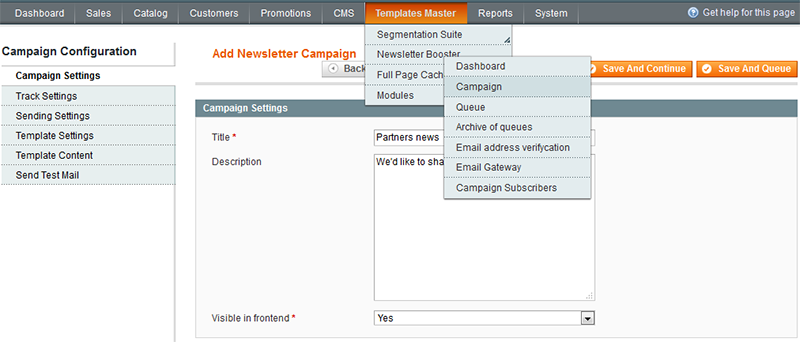
- Please specify the title of new campaign in the Title field.
- Add the description for new campaign in the Description field.
- By selecting Yes in the Visible in frontend field you allow customers to subscribe to new campaign what they are interested at right on the store page.
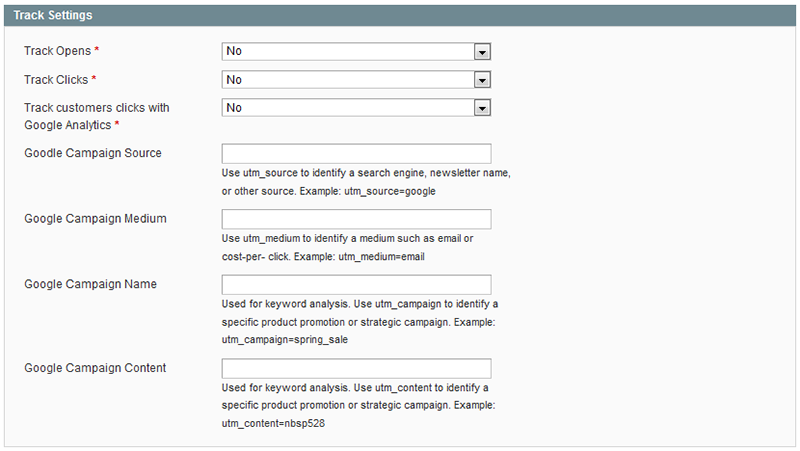
- Select Yes in the Track Opens field to be able to track whether the email was opened.
- Select Yes in the Track Clicks field to be able to track whether the customer visited website using link that was included in the email.
- Select Yes in the Track customer clicks with Google Analytics field to be able to track with Google Analytics Service whether the customer visited website using link that was included in the email.
- Select Yes in the Track customer clicks with Google Analytics field. Now you can track with Google Analytics Service whether the customer visited website, using link that was included in the email.
- In the Google Campaign Source field specify utm_source to identify a search engine, newsletter name, or other source. Example: utm_source=google.
- In the Google Campaign Medium field specify utm_source to identify medium such as email or cost-per- click. Example: utm_medium=email.
- In the Google Campaign Name field specify utm_campaign to identify a specific product promotion or strategic campaign. Example: utm_campaign=spring_sale.
- In the Google Campaign Content field specify utm_content to identify a specific product promotion or strategic campaign. Example: utm_content=528.
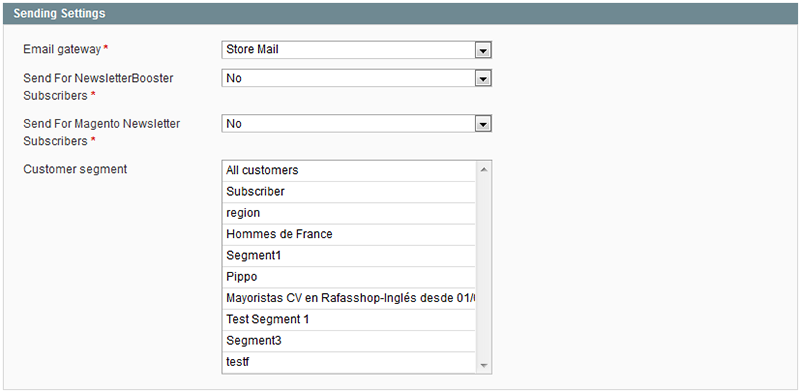
- Select the email gateway using drop-down in the Email Gateway field. If you want to have another gateway, you can go Magento Admin>Templates-Master>Newsletter Booster>Email Gateway and create a new Email Gateway.
- By selecting Yes in the Send for NewsletterBooster Subscribers field you enable sending campaigns to NewsletterBooster subscribers.
- By selecting Yes in the Send for Magento Newsletter Subscribers field you enable sending campaigns to magento newsletter subscribers.
- Now you can choose already created customer segment from drop-down in the Customer Segment field. You are allowed to send to send campaign to multiple segments.
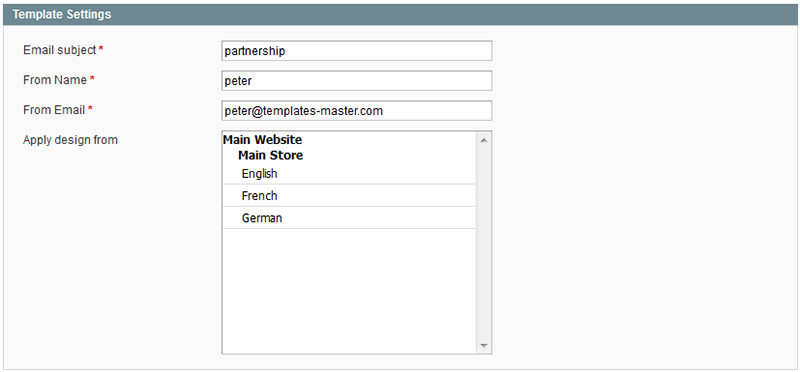
- Specify the main email subject in the Email Subject field.
- Specify the name in the From Name field. This name will be displayed at Subject field of email.
- Enter the email address from which the email will be sent, in the From Email field.
- Apply the design for your new Campaign from one of your store using drop-down in the Apply design from field.
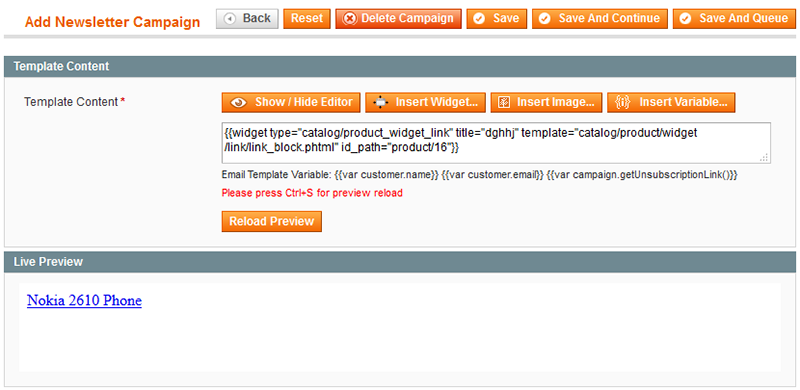
Specify the HTML code of newsletter in the Template Content field. Moreover, you can preview the content right in the backend. Please press the Reload Preview button after the text input.

In Test email address field you have to define the email address, which will be used for testing campaign emails.
Afterwards you can save the campaign as well as use the Save and Queue button at the right corner of the page. It will allow you to manage queue of emails that were sent.
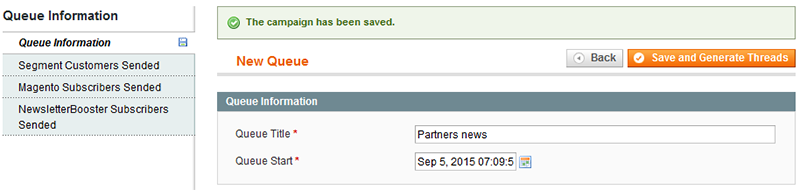
Please specify the title of the e-mailing in the Queue Title field. By using the calendar you can select and set the date of e-mailing start.
In the next section we’re going to review in details the Queue interface of the Newsletter Booster plugin.
Managing Queue
In order to improve newsletter efficiency and performance, our Newsletter Booster module provides you with special queue methods. Using clear queue interfaces, you will be allowed to schedule newsletter queue start date properly. In addition, you will easily track the results of sent campaigns such as:
- tracking sended data
- tracking opens and unopens
- tracking clicks
Considering that the extension enables sending campaigns to three separate sources, you will be able to track clicks and opens based on Segment customers, Magento subscribers and Newsletter Booster subscribers’ types.
After the e-mailing started, you can make use of settings mentioned below. In order to track and search the campaign results you need, please go Admin>Templates-Master>Newsletter Booster>Queue.
Simply choose the campaign queue you want to track and keep on following.
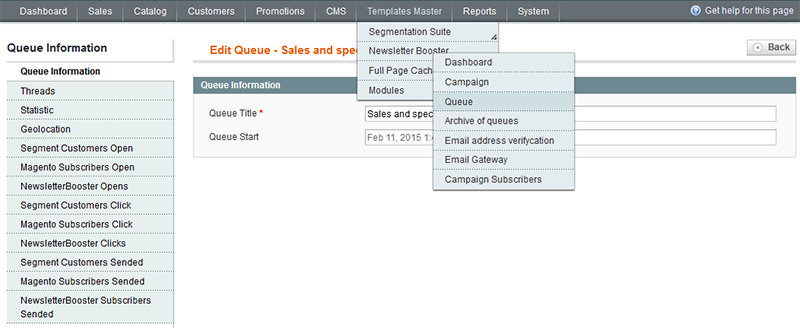
- Using Threads grid data you can track the process of e-mailing in details. You can see the queue start and finish, the number of errors, recipients. In case the cron status has the stopped value, the thread is not running.
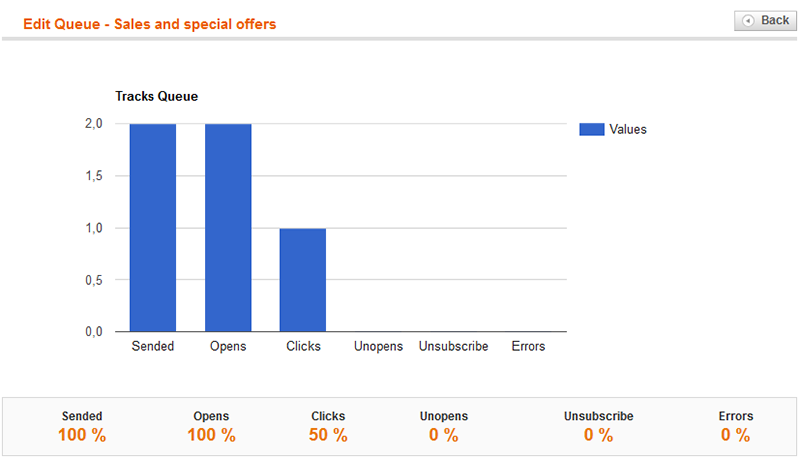
- Using Statistic you can track sent, clicks, opened, unopened, unsubscribed and errors of queue in a diagram.
- Using the Geolocation you can track the geographic location of the object who opens an email. Note: please click on green point and the map will be downloaded. Here you can track the city where the customer visited website using link that was included in the email.
Afterwards you are allowed to track the e-mailing process depending on campaign subscribers ‘ groups. So, you can follow clicks, opens and sended campaigns to default Magento subscribers, Segment customers’ groups and Newsletter Booster subscribers.
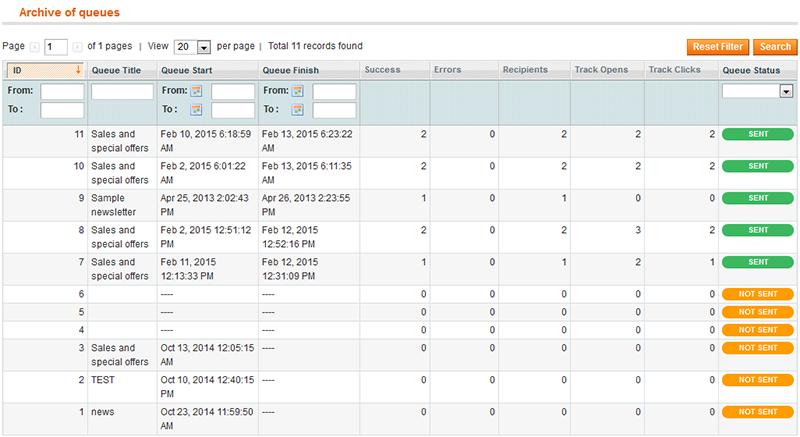
In order to look over the campaigns' data queued before, you can use the Archive of queues interface. Old queues information was archived to a different database in order to make the main queue tab smaller. Please go Admin>Templates-Master>Newsletter Booster>Archive of queues and track the required information.
Email Verification
Our extension comes with email address verification support. You can check how it works by navigating to Magento Admin>Templates Master>Newsletter Booster>Email Address Verification.
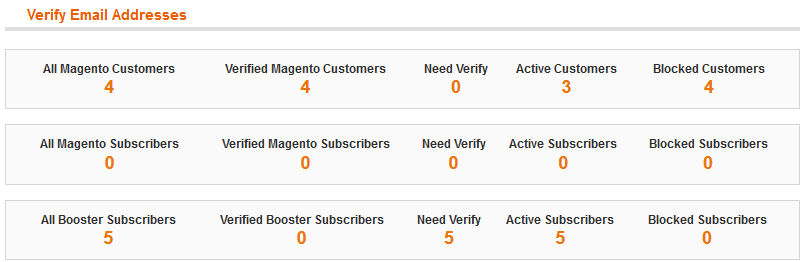
- By using the next interface, you can track email address verification statistics. Data are categorised according campaign sources.
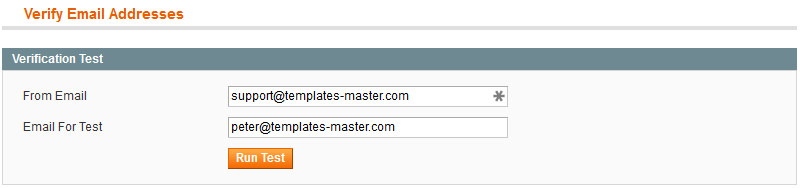
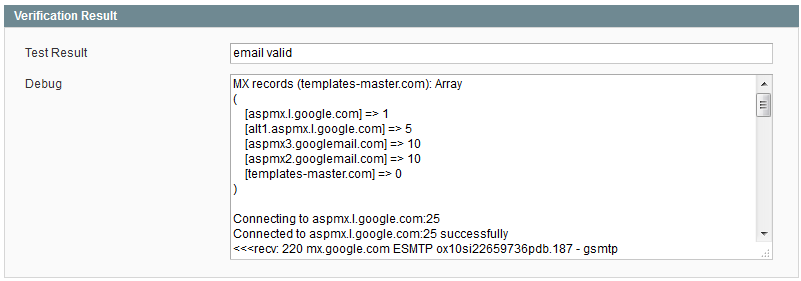
- The extension allows you to check whether the email address is valid. You can use this feature before sending testing mail to the recipient. Thereby after checking whether the mailbox exists, you would easier start your newsletter campaign. Please enter the address requested for verification in the Email For Test field. The From Email field is required, that’s why please enter the email address from which the test will be sent. After filling fields, you have to press Run Test button.
Now you can see the test results. Keep sending!
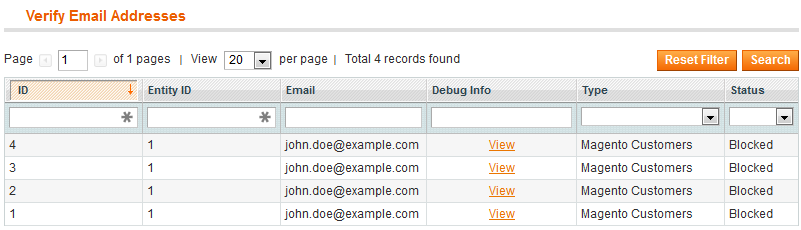
- By following the next interface you are allowed to review all verified email addresses by the debug information, campaign source type, etc.
Examples of using Newsletter Booster
Creating customer segment for all customers
- Go Magento Admin>Templates Master>Segmentation Suite>Customer Segment and click Create Segment.
- At Conditions tab please leave field blank to apply segment for all customers.
- Click on Save Segment.
Creating customer segment for customers who bought products from category
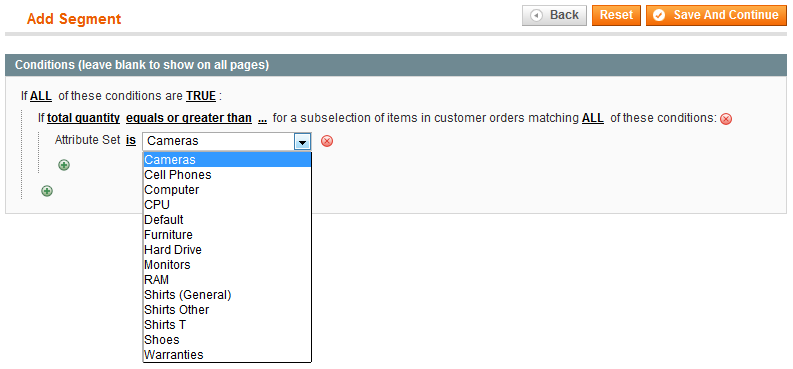
- Go Magento Admin>Templates Master>Segmentation Suite>Customer Segment and click Create Segment.
- At Conditions tab select Order Product Attribute.
- The Total quantity must be Equal or greater than.
- Click on green dot and choose the condition Category.
- Then please press grid button and select subcategory.
- Click on Save Segment.
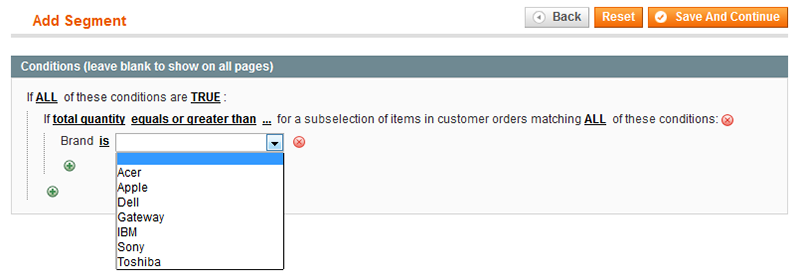
Creating customer segment for customers who bought products from brand
- Go to Magento Admin>Templates Master>Segmentation Suite>Customer Segment and click Create Segment.
- At Conditions tab select Order Product Attribute.
- The Total quantity must be Equal or greater than.
- Click on green dot and choose the condition Brand.
- Then please press 3 dots and select one of brands.
- Click on Save Segment.
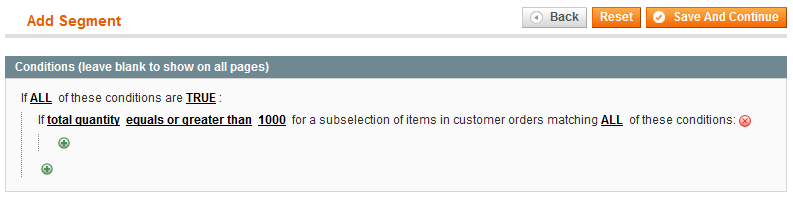
Creating customer segment for customers with total order
- Go to Magento Admin>Templates Master>Segmentation Suite>Customer Segment and click Create Segment.
- At Conditions tab select Order Product Attribute.
- The Total amount must be Equal or greater than 1000.
- Click on Save Segment.
Creating and sending first email campaign
- Go to Magento Admin>Templates Master>Segmentation Suite>Customer Segment and click Create Segment.
- If you use Mandrill Appi Service or store mail to send emails, then go to the next item. If not and you want to create third-party mail server, please go Magento Admin>Templates Master>Newsletter Booster>Email Gateway and click on Create Gateway.
- Then go Magento Admin>Templates Master>Newsletter Booster>Campaign and click on Create Campaign.
- Please fill all fields according to your needs and click on Save Campaign.
- Then press Queue button at the right top of the page that appeared after saving new campaign.
- Please fill all fields according to your needs and click on Save Queue.
- Then you can go to Magento Admin>Templates Master>Newsletter Booster>Dashboard and check the statistical information.
Sending newsletter campaigns to different groups of subscribers
Please notice, that by using our extension you are enabled to create and send newsletter campaigns to Customer segment users, Magento newsletter subscribers and Newsletter Booster subscribers separately. We’re going to explain the sending process to Customer Segment subscribers.
- Go Admin>Templates Master>Segmentation Suite>Customer Segment and click Create Segment.
- Add Segment with filling all required fields. See examples mentioned in use cases above.
- Go Admin>Templates Master>Newsletter Booster>Campaigns and create a new Campaign. You can use the previous use case example.
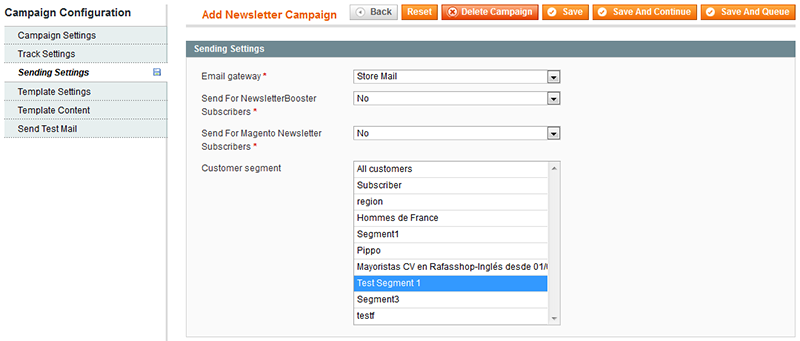
- Please specify the required information in all Campaign Configuration tabs.
- When you navigate to Sending Settings tab you can set campaign newsletter sending to specific subscribers’ group. In case of configuring sending settings for Customer segment group only, you have to select No both in the Send for Newsletter Booster subscribers and Magento newsletter subscribers fields.
- Select the already created customer segment from the drop-down.
- Save.
Note: if you want to send the newsletter campaign only to Magento subscribers or to the Newsletter Booster's subscribers separately, please select Yes in the appropriate fields.
Support
Template Master team is always ready to assist you with any issue related to our products.We do offer:
- Free commercial products installation services
- Free updates within offered support period
- 3 months of free guaranteed support
Our duties:
- Responsibility for resolving products bugs.
- Help with technical queries.
- Support of popular web browsers (Firefox, Chrome, Safari, Internet Explorer 7+).
- Technical support in installation and usage of our products.
Common questions and ideas
Come up with new ideas!
There are no product questions yet.