HelpMate Magento extension user manual
CONTENTS
3. General configurable options
How to use contact and helpdesk form
How to create Knowledge base article and assign it to product
How to create Knowledge base category and assign articles to it
Description
Helpmate was designed to improve communication support. Our extension simplifies the support process and makes it more efficient. The extension consists of 2 tightly integrated modules:
- Help Desk extension helps a dedicated support team to provide prompt support to store users.
- Knowledge Base provides a categorised directory for frequently asked questions and answers.
Helpmate extension was created in order to allow you:
- to accept issues via e-mail, contact form or customer account page 24 hours per day & 7 days per week
- to help focus your support team on really important issues while ignoring inactive tickets
- to create knowledge articles based on already solved clients issues, which will allow your customers to help themselves without bothering your support team
Basic terms
Support department - allows to group your support team on separate departments in order to increase support efficiency.
Admin Users - specially designated staff which is responsible for answering requests. Each admin can participate in various support departments.
Email Gateway - divides emails with access via either pop3 or imap protocol. The feature allows to establish 2-way communication from user to specific support departments.
Ticket - is a separate issue posed by the customer and assigned to specific department. Ticket can be created via contact form, helpmate form, backend or via email.
Notification email - is an email which provides the notification about ticket updating both for admin and user.
Installation
Turn store compillation off:
Navigate to Admin -> Tools -> Compilation and deactivate compilation mode for your store.
Copy all files into your magento directory:
Simply copy all files from "extension source x.x.x" directory into your magento store directory.
In case you have different than "default" default folder - rename folders app/design/frontend/default/default and skin/frontend/default/default.
Turn your magento cache off:
Navigate to Admin -> System -> Manage Cache and deactivate cache for your store.
Next steps:
- Navigate to System > Configuration > Templates-Master > Helpmate and enable extension for any store you need.
- Configure Helpmate module according to your needs.
- Navigate to Templates Master > Helpmate > Department and create your first support department.
- Navigate to Templates Master > Helpmate > Email Gateways and configure email gateway that will be used to process tickets.
PLEASE NOTICE THAT ALL EMAILS AT THIS ADDRESS WILL BE DELETED IN INITIAL E-MAIL PROCESSING.THIS EMAIL SHOULD NOT USED BY ANY OTHER EMAIL SOFTWARE.
That's all. Your clients can use HelpMate to submit their request and track resolution process.
General configurable options
To set the following configuration of the extension, go to Admin-> Configuration>Templates-Master->Helpmate.
Helpmate
General

- In the Enable Helpmate field please select Yes.
-
Select Yes in the Enable Attached File field in order to allow customers to attach files to their support request.
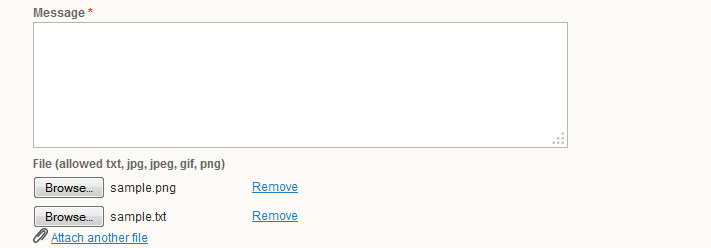
- In the Allowed Extensions Attached File field select an allowable file extension whick will be attached to tickets.
- In the Auto close ticket after x day field specify the number of days after which inactive tickets will be closed.
-
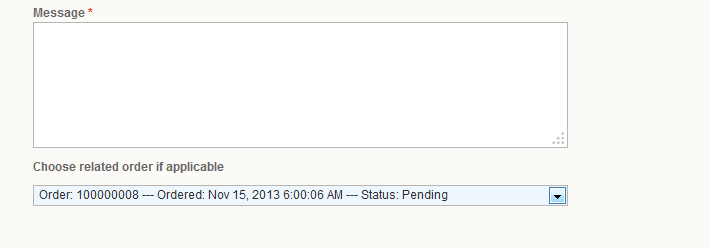
If you select Yes in the Enable Order Select field, you allow users to assign ticket to the specific order.
-
In the Enable Akismet field you can enable or disable Akismet anti spam filter. Helpmate is provided with separate Akismet integration module. So you have to obtain Akismet API info at
https://akismet.com/signup/
and then enable Akisment at Admin > System > Templates Master > Akismet.
(http://en.support.wordpress.com/api-keys/).

Ticket form
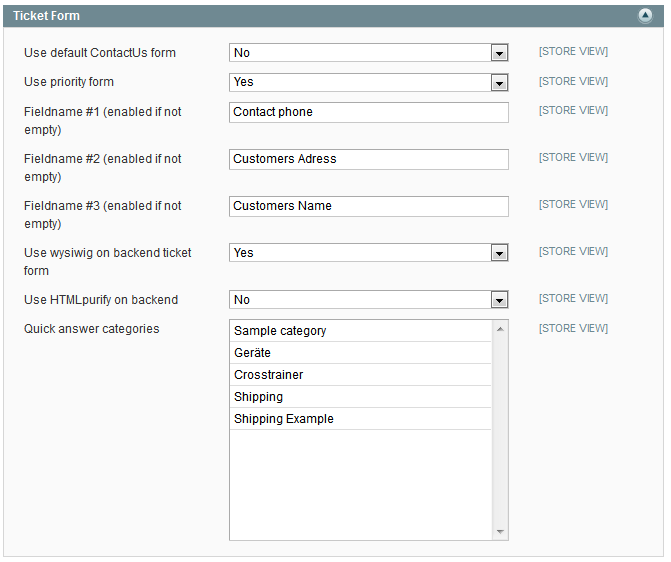
- Select Yes in the Use default ContactUs form field to enable using of default magento Contact form. In case you select No, the default form will be disabled and all customers requests, submitted via contact form, will be processed by Helpmate.
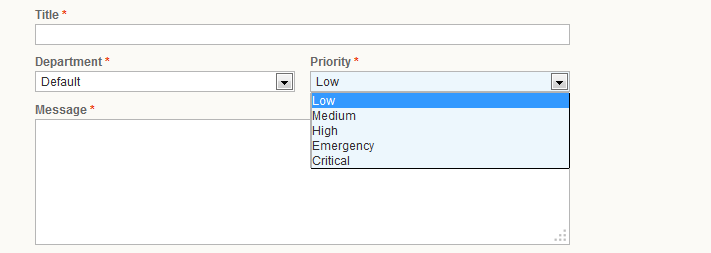
- If you select Yes in the Use Priority form field, customers can define the urgency level from the dropdown list.
- In the Fieldname #1, #2 and # 3 fields (enabled if not empty) you can specify additional information for your issue.
- In the Use wysiwyg on backend ticket form field select Yes to enable WYSIWYG editor for tickets.
- If you select Yes in the Use HTMLpurify on backend field, you enable filtering of html output for backend. In case you select No, the option will be disabled and html content will be shown in admin tickets interfaces processed with HTMLpurifier in order to make it secure (htmlpurifier doesn’t guarantee 100% protection from all types of HTML injection).
- In the Quick answer categories select KB category, that was created earlier and assigned as “Quick answer category“.
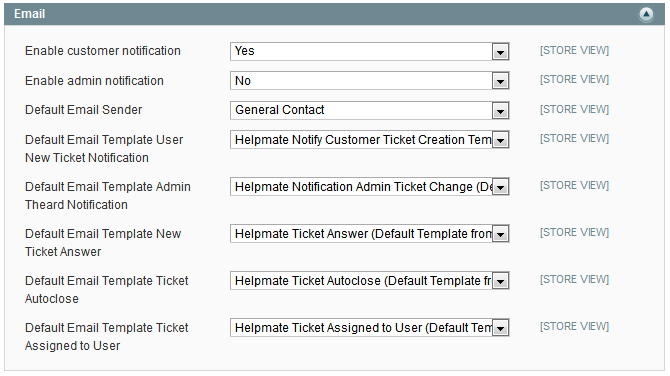
- If you select Yes in the Enable customer notification field, the customer will get notification about update ticket.
- If you select Yes in the Enable admin notification field, the admin will get notification about update ticket.
- In the Default Email Sender field specify the Sender, who will send email.
- In the Default Email Template User New Ticket Notification select the email template for user notification of new ticket.
- In the Default Email Template Admin Theard Notification select the email template for admin notification.
- In the Default Email Template New Ticket Answer field select the email template for answer to email notification of new ticket.
- In the Default Email Template Ticket Autoclose field select the email template for inactive tickets notification.
- In the Default Email Template Ticket Assigned to User field select the email template for tickets that were assigned to user as outdated.
After all settings click on Save Config.
Knowledge Base
In order to enable and configure the Knowledge Base extension, please go Admin-> Configuration>Templates-Master>Helpmate.

- Select Yes in the Enable Knowledge Base field to enable the Knowledge Base extension for separate store.
- Select Yes in the Enable Knowledge Base on Product Page field to enable the knowledge base block on products page.
Core features
The Helpmate extension allows you to use easy to support interfaces, email gateways, department and tickets at your Magento store in order to improve your store support process. Knowledge Base extension makes support easier and reduces number of support requests.
Cron configuration
In order to get customers' answers via email and to close inactive tickets, the Helpmate extension uses core Magento cron process. For more details about configuring Magento cron please check http://www.magentocommerce.com/wiki/1_-_installation_and_configuration/how_to_setup_a_cron_job
Helpmate cron settings are set at app\code\local\TM\Helpmate\etc\config.xml with following xml code.
<crontab>
    <jobs>
        <tm_helpmate_mail>
            <schedule>
                <cron_expr>*/5 * * * *</cron_expr> <!-- */5 * * * * -->
            </schedule>
            <run>
                <model>helpmate/observer::sheduledAddEmailedTicket</model>
            </run>
        </tm_helpmate_mail>
        <tm_helpmate_auto_close>
            <schedule>
                <cron_expr>0 0 * * *</cron_expr> <!-- Daily at midnight  -->
            </schedule>
            <run>
                <model>helpmate/observer::autoCloseTicketAfterXDay</model>
            </run>
        </tm_helpmate_auto_close>
    </jobs>
</crontab>
For example, in order to change interval for checking email gateway, you have to change cron time settings in the code provided below <cron_expr>*/5 * * * *</cron_expr>.
Time interval for email gateway processing is set every 5 minutes by default. The interval for ticket auto close process it’s set to 1 time per 24 hours.Managing Email Gateways
Email Gateways allows you to set two way communication channel between user and support staff. Helpmate will read customers messages from email gateway and assign them to appropriate tickets or create new one.
NOTE : You can create some gateways and assign them to appropriate departments or stores.
To create a new gateway, go Admin>Templates Master>Helpmate>Email Gateway and click the Add Gateway button.

- In the Name field specify the Gateway name.
- In the Email field enter the email address, which will be used to receive emails from customers.
- Enable the current Gateway.
- In the Type field select POP3 or IMAP protocol, that will be used by your email server.
- In the Host field enter the address of your email server.
- In the User field specify the user’s name or email address for authorization.
- In the Password field define the user’s password.
- In the Port field enter the port number for access to your email server. By default, the following ports are used :110 for POP3, 995 for POP3-SSL, 143 for IMAP-TLS and 993 for IMAP-SSL.
- In the Secure field select the type of secure. Possible values are None , SSl\TLS or STARTTLS.
- Click on Test Email Gateway Connection button and make sure of right configuration.
- Click on Save Gateway in the upper right corner.
NOTE: do not use the same email address for your gateway.
Managing Departments
Department’s settings allow to distribute different types of requests between various groups of support administrators. The use of different departments saves time and makes support process more efficient. In order to use our extension, you have to create at least one active department.
Also you can create multiple departments and direct support tickets to them. In order to create a new department go Admin > Templates Master > Helpmate > Department and click on Add Department button.
General

- In Show on frontend field select Yes, if you allow admin users to escalate issues within the appropriate hidden department.
- In the Text field specify the department Name.
- In the Store View select the store where the department will be active.This setting allows you to assign support department to separate store.
- In the Create date field select from the calendar the date of the department creation.
- In the Department users field you are allowed to assign administrators, who are responsible for answering support requests for this department. All admin users assigned to department will receive email notification on every new ticket created or updated in this department.
- In the Gateway field you are allowed to assign Email Gateway to current Department.
- In the Sender field select the way of sending ticket updates.
- In the New Ticket Template field select the email template for user notification about receiving his request.
- In the Admin Ticket Template select the email template for department notification about receiving the new message.
- In the Answer on Ticket Template select the template of admin response to the message.
- Click on Save Department button.
- In the Title field specify the ticket name.
- In the Create date field select the date of ticket creation from the calendar.
- In the Modified date field select the date of ticket modification.
- In the Store View field select the store, where the ticket was created. This way you are allowed to assign ticket to an order, that has been made in selected store.
- In the Department field specify the department name, where the ticket was assigned to.
- In the Assigned field select the admin user, who will be responsible for answering the customer request.
- Select the status of ticket in the Status field. Possible values are Open, Replied, On hold and Closed.
- In the Priority field specify ticket priority. Possible values are Low, Medium, High, Emergency and Critical.
- In the Email field enter the user email address.
- Order number field allows you to enter the additional information about a purchase due to which the ticket was sent.
- In the Phone field enter the user phone number.
- In the Address field enter the user address.
- In the Name field specify the user Name.
- In the Knowledge Faq field select the quick answer from drop-down list using either complete KB article or link, that was inserted before that.
- In the Quick Answers field select quick answer from drop-down list using either complete KB article from predefined FAQ category assigned in admin.
- In the Comment field specify the content for the ticket. The message will be added to ticket discussion and send to customer.
- Please tick off Hidden comment field if you want to hide a comment.
- In the File field you are allowed to attach file to the ticket.
- Click on Add Comment button.
- Click on Save Ticket button.
- In the Title field specify the new article Name.
- In the Url field enter the part of Url that identifies the article.
- Drop-down list in the Categories field allows you to select the category to which the request was sent.
- In the Store View field select the store the article will be posted in.
- In the Author field select an author who created the article.
- In the Rate field specify the article rating.
- In the Create Date field enter the article creation date.
- In the Modified date field enter the article modification date.
- Please specify the order in which the articles will be displayed in the Sort Order field.
- Select Enabled if you want to post the article.
- Click on Save Article button.
- In the Keywords field specify article keywords that will be used as article meta keywords header tag.
- The Description field allows you to add short description that will be used as article meta description header tag.
- Select Yes in the Active field to enable new category.
- In the Name field specify the category Name.
- In the Url field enter the part of Url that identifies the category.
- In the Store View field select the store, where the category is posted.
- Specify the category creation date in the Create date field.
- Please define the sort order in which the category will be displayed in the Sort Order field.
- In the Title please specify the ticket Name.
- In the Email field leave your email address.
- In the Department field specify the department which your ticket will be assigned to.
- Select the priority of ticket in the Priority field.
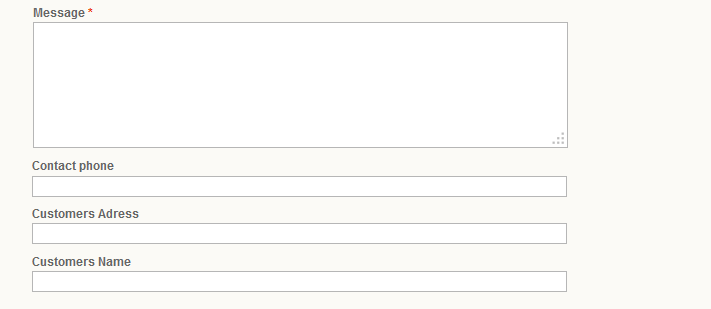
- In the Message field please describe the issue you have.
- In the Phone field enter your phone number.
- In the Address field enter your address.
- Specify your name in the Name field.
NOTE : if message comes from a gateway which is not selected, it won’t be assigned to the Department.

Managing Tickets
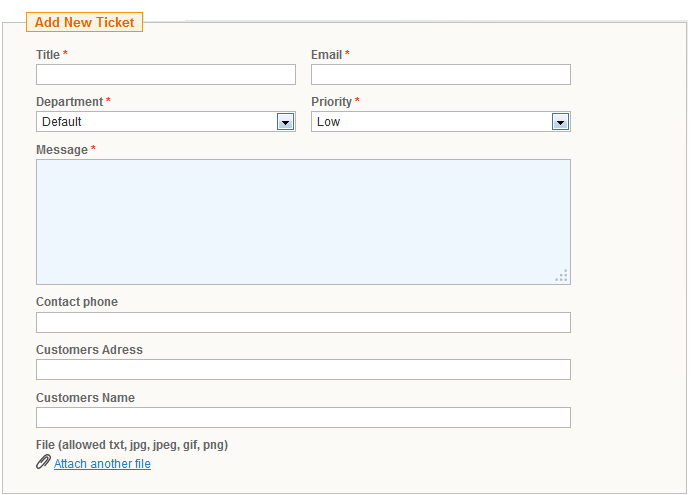
Tickets interface allows to manage tickets and answer them from admin interface. Admin users can create tickets from the backend and reply to tickets via email. Tickets can be created from orders page, customers information page or directly from tickets listing interface. Customers can create tickets from their account pages, contact or custom Helpmate form. In order to create ticket from the backend, go Admin>Templates Master>Helpmate>Tickets and click on Add New ticket button.
General details
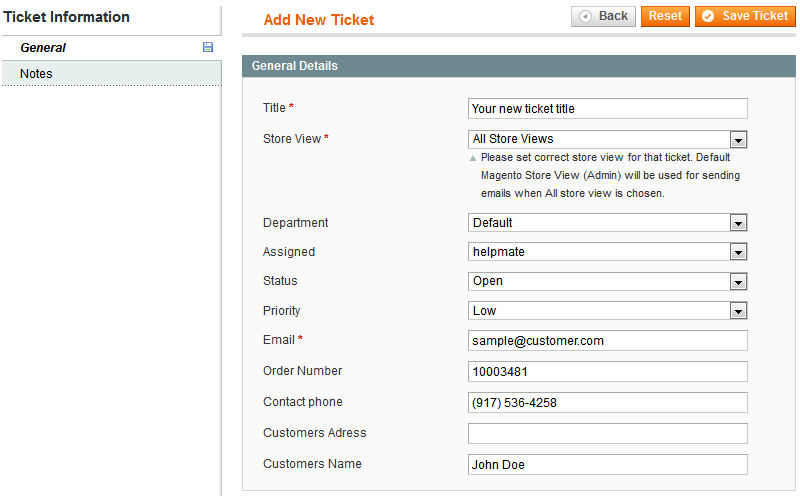
NOTE: Please set correct store view for that ticket. Default Magento Store View (Admin) will be used for sending emails when "All store view" is selected.
Add Comment
Ticket information settings allow you to specify the content for the ticket and attach files.

Notes

In the Notes field, you can specify any information you want. This field is visible for admin users only and is out of customers reach.
Managing Knowledge Base
Knowledge base articles are created by store support team in order to help users to solve their issues themselves. Knowledge base provides Article and Category interfaces.
Usually article contains description of problem and provides solution of it.
Creating new articles
In order to create new article, please Admin>Templates Master>Knowledge Base>Article and click on Add New Article button.

Content

Content field allows you to enter content for each article. You can use either default Magento WYSIWYG editor or pure html code.
Meta

Creating new categories
Articles can be organized by Category to make easier what the customers are looking for. In order to create new category, please go to Admin>Templates Master>Knowledge Base>Category and click on Add New Category button.

Submitting support request from front-end interface
Helpmate front-end interfaces allow store visitors to submit support request,get access to pending tickets and use the store Knowledge base.Contact form
Contact Us form allows to send support requests from the client to store support team. After Helpmate installation you can still use the default Contact us form. In order to use it, you have to enable that option in Helpmate configuration.
Please notice, that *fields are required.
Helpmate priority form
Helpmate provides custom form, that was designed in order to decrease number of support requests. As soon as customer starts typing his question, Helpmate will suggest the solution, based on articles in knowledge base. At the bottom of the window there are recommendations how to ask a question and get prompt and precise answer.
In order to start using this form, it should be first enabled at Admin > System > Configuration > Templates Master > Helpmate. After that customers can access that form at yourstore.com/helpdesk.
If you will not find the answer to request which you need, you will be offered to Add new Ticket. Please fill the form and click on Save ticket.

Customer tickets interface

Registered customers can create tickets right from their account pages. Please use pagination toolbar to make the tickets searching process faster.

NOTE: The Department and Priority fields can be disabled by store administrator only.
Knowledge Base index page
To find faster the article you need, please use Knowledge Base index page.

Knowledge Base article page
Before sending the ticket to support department, try to find the answer to your request on the knowledge base article page. There are a lot articles, which have been written in accordance with FAQs Clients.
NOTE : FAQs Clients are frequently asked questions.
Use cases
In support process use cases provide results of Helpmate modules performance. Use cases also will show you how the extension can help to your customers. To get started find a helpmates you like, please go Magento Admin > Templates Master > Helpmate. It will take you to settings where you can simplify and improve the work of your support team.Helpmate
How to use contact and helpdesk form
Go to Admin>System>Configuration>Templates Master>Helpmate.The following steps are:
- click on Ticket form
- at Use Default Contact Us form please select Yes
After saving configs go to your frontend and click on Contact us at the foot of the page.
Go to Help Desk link and describe the problem you are having, by using keywords.There are available articles which can help you to answer a request. If nothing found, click on Add New Ticket. Please fill the required fields and click on Save Ticket.
Knowledge Base
Please go to Admin>Templates Master>Knowledge base.
How to create Knowledge base article and assign it to product
Select Article from grid interface. Click on Add New Article and apply the following settings:
At Article information
- at Title field specify the article Name
- at Status field select Enabled
At Content write the article and click on Save Article.
Then open the product and go to the Knowledge Base. Select article and save product information. After that link to article will be shown on products page.
How to create Knowledge base category and assign articles to it
Select Category from drop-down window at the top menu. Click on Add New Category and apply the following settings:
- at Active field select Yes
- at Name field please create the category name
Then go to Templates Master>Knowledge base>Article and select Article Information. Enter the created category Name at Category.
How to add link to Knowledge base page at your store
The link for KB home is located by default at http://yourstore.com/knowledgebase/index/index
You can add the link to Footer links CMS static block.
How to add article to Quick Answer interface
Before adding article to ”Quick answer” interface, please create KB category and assign it as “Quick answer category“ in Helpmate configuration settings. After that every article that is assigned to that category, can be used for posting quick answers.
Support
Template Master team is always ready to assist you with any issue related to our products.
We do offer:
- Free commercial products installation services
- Free updates within offered support period
- 3 months of free guaranteed support
Our duties:
- Responsibility for resolving products bugs.
- Help with technical queries.
- Support of popular web browsers (Firefox, Chrome, Safari, Internet Explorer 7+).
- Technical support in installation and usage of our products.
Troubleshooting:
You can follow the product questions and read frequently asked questions from users.
If you have any problems with extension installation please contact us at helpdesk.
Common questions and ideas
Come up with new ideas!
There are no product questions yet.