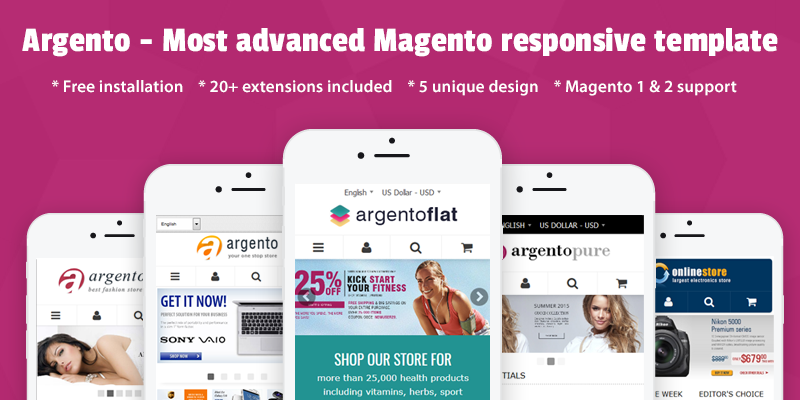
Magento Attributes and Brands pages extension user manual
CONTENTS
Use of codes for display the attributes labels next to product
Using Magento Attributes and Brands pages extension with Navigation Pro extension
Description
Attributes & Brands Page extension was developed to help you:
- Create attractive attributes and brands pages
- Improve your navigation with brands widgets
- Improve your store design with brands slider widgets
- Create landing page with almost any attribute such as brand, color, book author or film genre
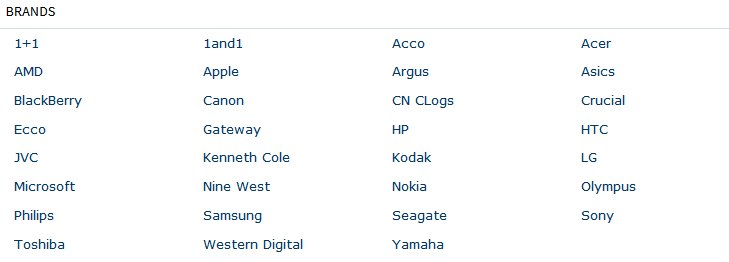
Your store customers will be allowed to quickly find out the brands and products they wonder. The extension allows to create brands pages, that show all brands grouped by alphabet in several rows with images, all brands in one row with text links or all brands grouped by alphabet in several rows with text links. Furthermore your customers can search products on the custom attributes page that shows all available products colors grouped by alphabet in several rows with text links.
Within a selected brand, buyers can also search the products by other options like category, color and price.
Attributes & Brands Page extension is easy to configure and provides next key features :
- Ability to create unlimited number of brand/author/color and other pages
- Select and multi-select attributes with predefined values are supported
- Magento layered navigation supported, while browsing specific brand
- Provide flexible customization of attributes listing
- Support SEO url for all brands pages
- Allows to exclude attributes from listing
- WYSIWYG support
- Multi-store support
- Comes with 2 Magento widgets
Installation
Thank you for downloading our magento extension. Please follow these instructions to proceed with the installation of your theme:
Turn store compilation off
Navigate to Admin -> Tools -> Compilation and deactivate compilation mode for your store.
Copy all files into your magento directory
Simply copy all files from "extension source x.x.x" directory into your magento store directory.
Turn your magento cache off
Navigate to Admin -> System -> Manage Cache and deactivate cache for your store.
Refresh your admin user access rights
Simply logout from your store admin and then login back.
If you have any problems with extension installation, please contact us at templates-master.com/helpdesk and we will help you with extension installation for free.
Admin interfaces
Manage Pages
Attributes pages extension allows to create unlimited number of attribute pages directly in admin interface. In order to add and edit landing page, please go Admin>Templates Master>Attribute Pages and select Manage Pages.
Page Information tab
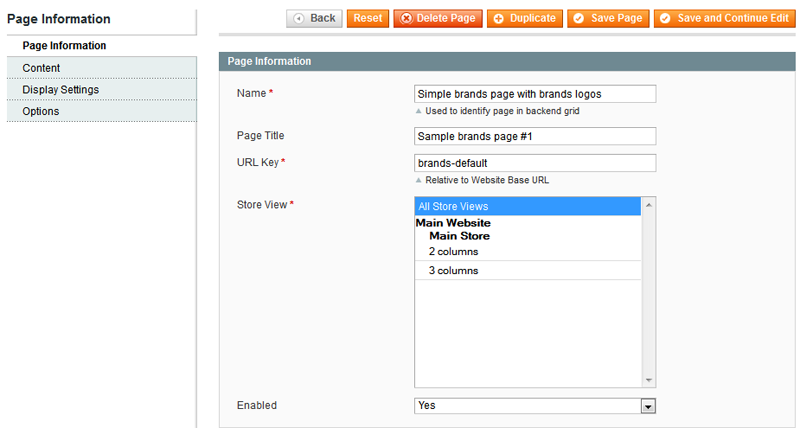
1. In the Name field specify page name. Please notice, the name will help you to identify page only in backend grid.
2. Specify the page name for store customers in the Page Title field.
3. In the URL Key field enter the URL for new page.
3. Select the store, where the page will be displayed, in the Store View field.
4. In the Enabled field Select Yes to enable the page.
Page Content tab
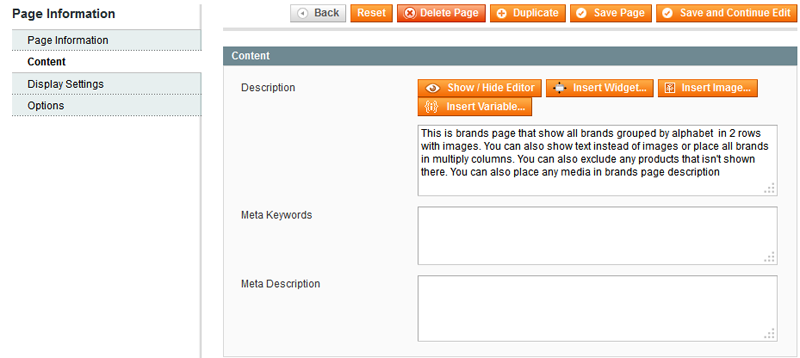
1. In the Description field you are allowed to put the description for new page. You can enrich your attributes pages content using WYSIWYG editor or Magento widgets.
2. Specify keywords in the Meta Keywords to let customer find this page faster.
3. Specify the description in the Meta Description field.
Page Display Settings tab
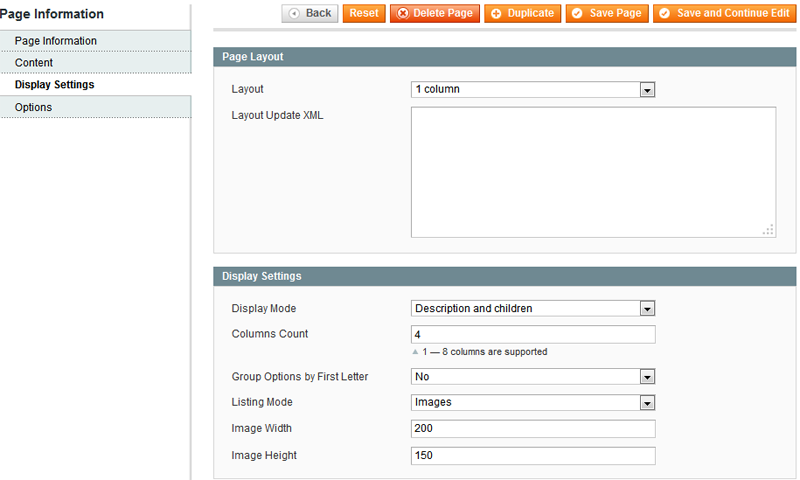
Page Layout fieldset settings allow you to select layout for the attribute page. Also you can put the Layout Magento XML code in the Layout Update XML field.
At the Display Settings fieldset please follow next steps:
1. In the Display Mode field select from the drop down list the display mode for the page.
2. In the Columns count field you are allowed to choose up to 8 columns to display attributes on the page.
3. Select Yes in the Group Options by First Letter field to group brands.

4. In the Listing Mode field select images or links to list brands on the page.
5. Specify the image width in the Image Width field.
6. Specify the image height in the Image Height field.
Page Options tab
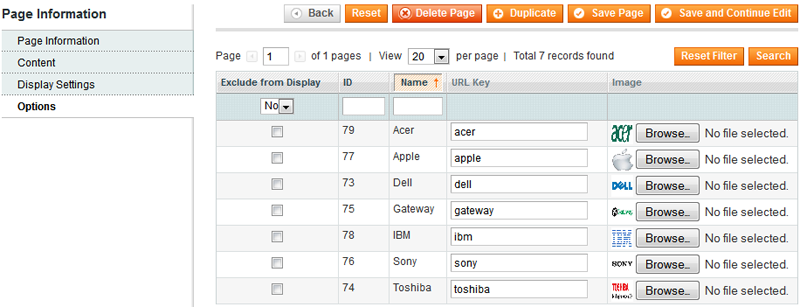
Page options tab enables to quickly assign links and images for all attribute options. It allows customers to quickly search created attributes pages.
Manage Page Options
Magento Attribute pages extension allows to configure each option page individually with such settings as image, text content and meta content, display mode and custom layout settings.
In order to add and edit page options, please go Admin>Templates Master>Attribute Pages and select Manage Page Options.
Option Information tab
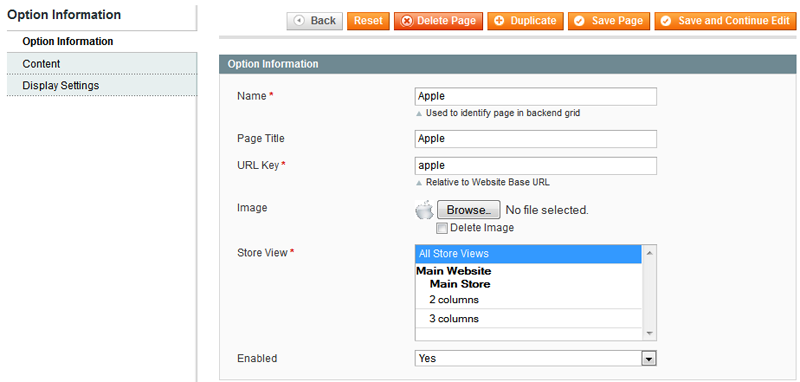
1. In the Name field specify option name. The name will help you to identify option only in backend grid.
2. Specify the option name for store customers in the Page Title field.
3. In the URL Key field enter the URL for new option.
4. In the Image field you are allowed to select and browse the image for the option.
5. Select the store, where the option will be displayed, in the Store View field.
6. In the Enabled field Select Yes to enable the option.
Option Content tab
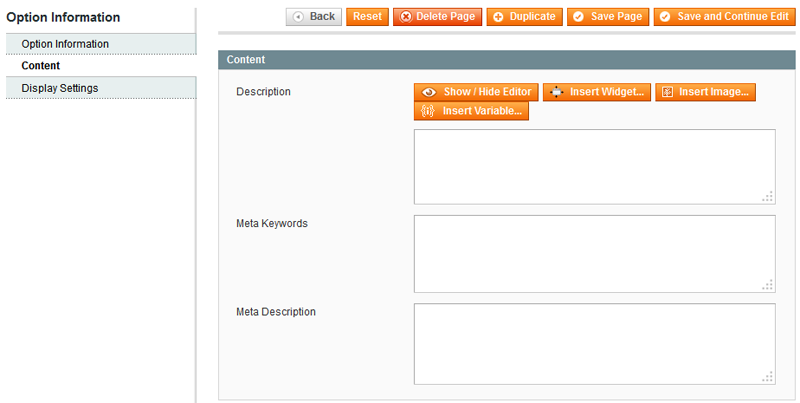
1. In the Description field you are allowed to put the description for new option.
2. Specify keywords in the Meta Keywords to let customer find this page option faster.
3. Specify the description in the Meta Description field.
Option Display Settings tab
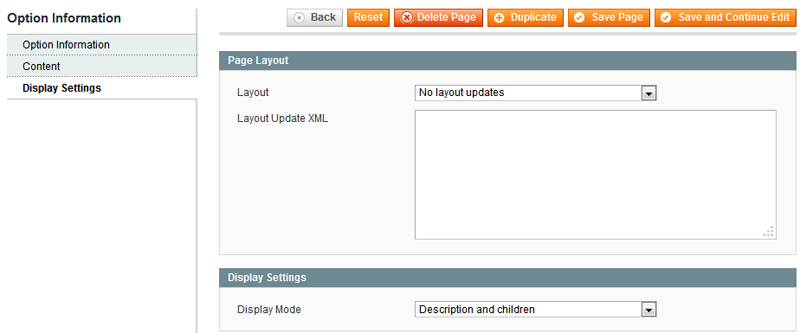
Page Layout fieldset settings allow you to select layout for the option page. Also you can put the Layout Magento XML code in the Layout Update XML field.
At the Display Settings fieldset select the display mode for the option page in the Display Mode field:
- If you select Description and children mode, then the both description and the content of the page will be shown.
- If you select Description only mode, then only the page description will be shown.
- If you select Children only mode, then only the page content will be shown.

Blocks and Widgets
Magento Attributes and Brands pages extension provides two block types that can be used on any store page. The first block type allows to display attribute based page list, the second one allows to display attribute option list.
Attribute based pages list widget
You can create Attributes pages list widget using the default magento widget interface.

At Widget Options fieldset please follow next steps:
1. Specify the widget name in the Title field.
2. Specify the number of columns for the widget to be displayed in the Columns Count field.
3. If you want to exclude some pages, please identify them comma separated in the Pages to exclude fields.
4. If you want to include specific pages, please enter them comma separated in the Pages to include fields.
5. Select Yes in the Remove Block Wrapper and Title field to remove block wrapper and title. This is useful when you want to display block inside the navigation block.
Option list widget
You can find widget insert interface at any magento based WYSIWYG fields.
 At Widget Options fieldset please follow next steps:
1. In the Attribute Page Url Key specify the URL of previously saved attribute based page.
2. In the Title field specify the widget name.
3. Please select the widget display mode in the Mode field.
4. Specify the image width in the Image Width field.
5. Specify the image height in the Image Height field.
6. If you select Yes in the Show as a Slider field, then the widget will be displayed as a slider.

7. Specify the number of columns for options list in the Columns Count field.
8. If you select Yes in the Group Options by First Letter field, the options list will be displayed in alphabetical order.
9. Select Yes in the Remove Block Wrapper and Title field to remove block wrapper and title. You may find this useful to display block inside the navigation block.
Use cases
Use of codes for display the attributes labels next to product
Please find out the template path you need to change, using the template hinting feature in Magento backend: System->Configuration -> Advanced ->Developer->Debug for store view level. In order to display the attributes labels next to product, we recommend you to add the following code:
<?php
// product page
    echo Mage::helper('attributepages/product')
        ->setProduct($_product)
        ->setAttributeCode('brand')
        ->toHtml();

// category page
    echo Mage::helper('attributepages/product')
        ->setCollection($_productCollection)
        ->setProduct($_product)
        ->setAttributeCode('brand')
        ->toHtml();
?>
NOTE: In order to prevent multiple queries, always set the collection with setCollection($_productCollection) method while showing labels on category page.
You can find the list of available methods and possible values here:| Method | Possible values | Description |
|---|---|---|
| setCollection | ProductCollection | Use this parameter, when showing attributes for whole collection |
| setProduct | ProductModel | Options of this product will be shown |
| setAttributeCode | Attribute code
Array of attribute codes |
To display one label
To display more than one label |
| setAttributeToShow | Attribute code
Array of attribute codes |
Use to display only some of loaded options |
| setAttributeToHide | Attribute code
Array of attribute codes |
Use to hide some of loaded options |
| setParentPageIdentifier | Attributepage identifier
Key=>value array of attribute codes and page identifiers |
Use when some attribute is linked to multiple attribute pages. For example: brands/amd and computers/amd and you would like to build a link to computers/amd
|
| setCssClass | hidden-label
a-center list-block clear |
Hide page title
Center options Show options line by line Use clear: all for options list |
| setCssStyle | Css styles: margin-top: 20px; border-bottom: 1px solid #eee;
|
Use to customize any style |
| setUseImage | false
array('color' => false, 'brand' => true) |
Disable image for all attributes
Disable for color and enable for brand |
| setUseLink | false
array('color' => false, 'brand' => true) |
Disable link for all attributes
Disable for color and enable for brand |
| setSize | Two numbers | Width and height of the image |
| setKeepFrame | false | Set false to resize image by larger side only |
| setTemplate | Template path | Render options with custom template |
Examples
Product page
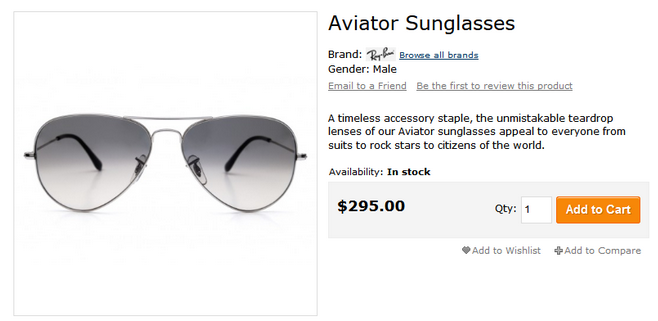
In order to display the image like this on the product page, please add the following code:
<?php
    echo Mage::helper('attributepages/product')
        ->setProduct($_product)
        ->setAttributeCode(array('brand', 'gender'))
        ->setCssClass('list-block')
        ->setParentPageLinkTitle(array(
            'brand'  => 'Browse all brands',
            'gender' => false
        ))
        ->setUseImage(array(
            'brand'  => true,
            'gender' => false
        ))
        ->setUseLink(array(
            'brand'  => true,
            'gender' => false
        ))
        ->setSize(38, 17)
        ->setKeepFrame(false)
        ->toHtml();
?>
Category page
On the category page you can display the attribute label using various samples.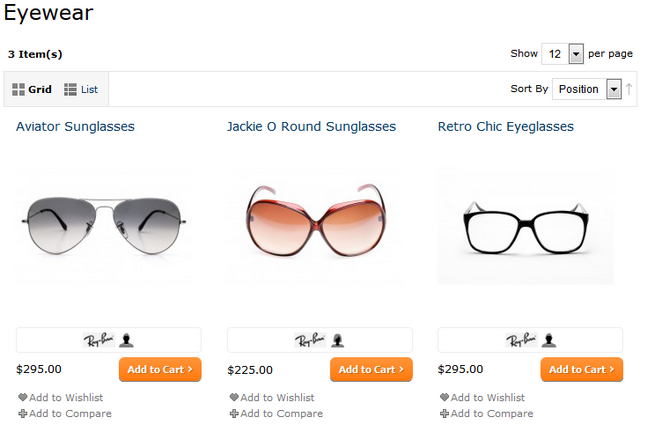
In order to display the attribute label, mentioned above, please add the following code:
<?php
    echo Mage::helper('attributepages/product')
        ->setCollection($_productCollection)
        ->setProduct($_product)
        ->setAttributeCode(array('brand', 'gender'))
        ->setCssClass('hidden-label a-center')
        ->setUseLink(array(
            'brand'  => true,
            'gender' => false
        ))
        ->setSize(38, 17)
        ->setKeepFrame(false)
        ->toHtml();
?>

In order to display the attribute label in such way, add the following code.
<?php
    echo Mage::helper('attributepages/product')
        ->setCollection($_productCollection)
        ->setProduct($_product)
        ->setAttributeCode(array('brand', 'gender'))
        ->setCssClass('hidden-label')
        ->setSize(38, 17)
        ->setKeepFrame(false)
        ->toHtml();
?>
Sidebar

In order to display the attribute label for example in some of additional blocks on the page, you can use the following code:
<?php
    echo Mage::helper('attributepages/product')
        ->setCollection($_products)
        ->setProduct($_item)
        ->setAttributeCode('brand')
        ->setCssClass('hidden-label list-block')
        ->setSize(40, 20)
        ->setShowParentPage(true)
        ->setParentPageLinkTitle('View other brands')
        ->toHtml();
?>
Use of codes for insert blocks on the page
Option list
You can use the following ways for blocks' insert on the page:
Widget
Layout XML
- Slider
- List with all available options
- List without block title and wrapper
Attribute based page list
Widget
Layout XML
- List with all available options
- List without block title and wrapper:
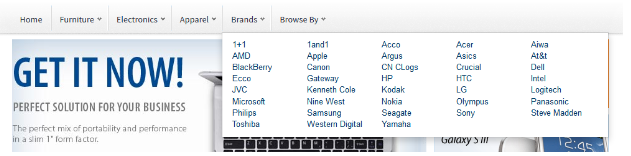
Using Magento Attributes and Brands pages extension with Navigation Pro extension
Magento Attributes Brands and Pages module can be used to add drop down menu to Navigation Pro.
Adding brands menu with all brands after last menu item
In order to have menu above, please check if you have already created brands page at Admin>Templates Master>Attribute pages > Manage Pages. Then navigate to Navigation Pro backend interface and select menu to edit.
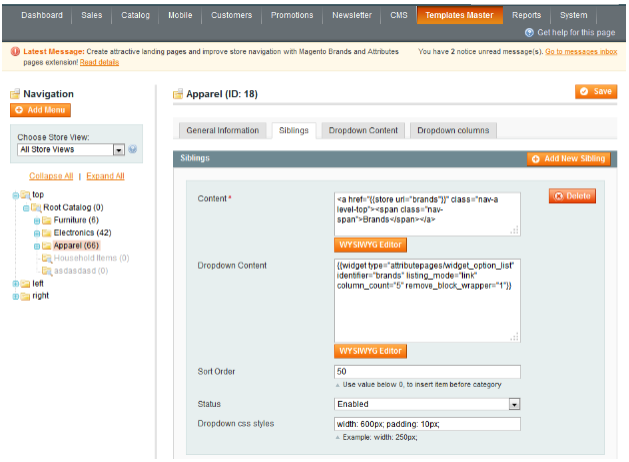
- Select last visible category.
- Open Siblings tabs and press 'Add New Sibling' button.
- Fill the form fields with following values:
- Content: <a href="{{store url="brands"}}" class="nav-a level-top"><span class="nav-span">Brands</span></a>
- Dropdown Content: {{widget type="attributepages/widget_option_list" identifier="brands" listing_mode="link" column_count="5" remove_block_wrapper="1"}}
- Dropdown css styles: width: 600px; padding: 10px;
Adding Browse By menu with all attribute based pages after last menu item

In order to have menu above, please check if you have already created brands page at Admin>Templates Master>Attribute pages > Manage Pages. Then navigate to Navigation Pro backend interface and select menu to edit.
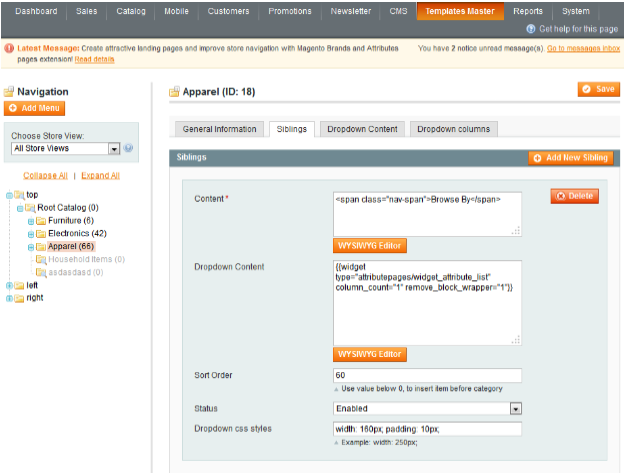
- Select last visible category.
- Open Siblings tabs and press 'Add New Sibling' button.
- Fill the form with following values:
Content: <span class="nav-span">Browse By</span>
Dropdown Content: {{widget type="attributepages/widget_attribute_list" column_count="1" remove_block_wrapper="1"}}
Dropdown css styles: width: 160px; padding: 10px;
Support
Template Master team is always ready to assist you with any issue related to our products.We do offer:
- Free commercial products installation services
- Free updates within offered support period
- 3 months of free guaranteed support
Our duties:
- Responsibility for resolving products bugs.
- Help with technical queries.
- Support of popular web browsers (Firefox, Chrome, Safari, Internet Explorer 7+).
- Technical support in installation and usage of our products.
Troubleshooting:
Magento Attributes and Brands pages extension is new module.
If you have any problems with extension installation please contact us at helpdesk.
Common questions and ideas
Question: I've changed the name of attribute, but the changes to the Brand attribute value do not get reflected in the Options.
Answer: If you change an attribute value in Catalog->Attributes->Manage Attributes->Brand, you need to go to Templates Master->Attribute Pages->Manage Options and update the Name and the Title of the corresponding Option there.
Come up with new ideas!
Please login to your account to post a question.