Email user manual
CONTENTS
3. General configurable options
Description
The Email extension was developed to improve emails sending in Magento. It allows you to easily send emails not only over the default magento send mail function, but over smtp and other email providers. The smtp server is an important part of your mail service. It deals with other smtp servers to deliver the e-mail. In order to configure transport, you need email address or Google Apps account, password and authentication settings. The module is fully integrated and provided with our popular magento extensions, such as Ask It, Helpmate, etc. By using separate SMTP servers, you will automatically reduce your mail server load. Please check our Email magento smtp extension and make sure that you are using absolutely secure and portable smtp service.
Installation
Thank you for downloading our magento extension. Please follow these instructions to proceed with the installation of your theme:Turn store compilation off
Navigate to Admin -> Tools -> Compilation and deactivate compilation mode for your store.Copy all files into your magento directory
Simply copy all files from "extension source x.x.x" directory into your magento store directory.In case you have different then "default" default folder - rename folders app/design/frontend/default/default and skin/frontend/default/default.Turn your magento cache off
Navigate to Admin -> System -> Manage Cache and deactivate cache for your store.Refresh your admin user access rights
Simply logout from your store admin and then login back.
General configurable options
The Email configuration allows you to define the email sender. Please go Admin > System > Configuration > Templates-Master > Email. Now you are allowed to select the email transport. The first value is the default SendMail sender, and other ones are email servers, that were created by using Email admin interface.
Admin interfaces
The Email extension provides user-friendly interfaces, that are easy and fast to set up on the first try.
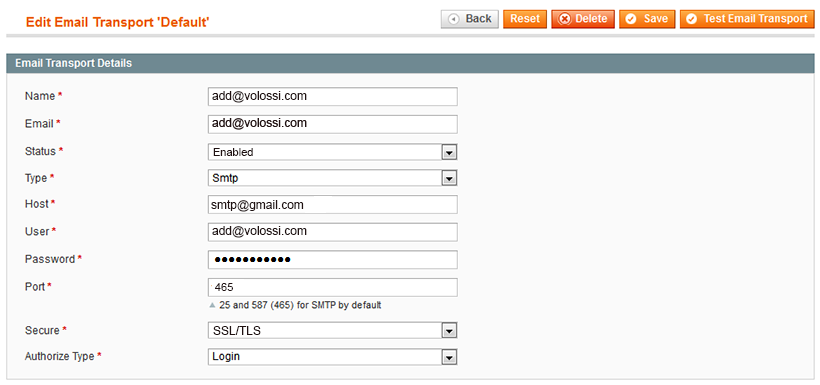
Go Admin > Templates-Master > Email > Email Gateways and select Transport. Now you have to add or edit your own email transport. You still can use the magento mail transport. However it would better to use any other transport created in the Email extension interface.
Transport interface
The Transport feature allows you to send email via different services. Right now it's fully integrated with SMTP and Google Apps. Next releases will be available with support of Mandrill and probably other mail sending services.

Please fill fields using our recommendations:
- Name - specify the email transport name
- Email - enter the email address, which will be used to receive emails from customers
- Status - enable the current email transport
- Type - select SMTP
- Host - enter the address of your email server
- User - specify the user’s name or email address for authorization
- Password - define the user’s password
- Port - enter the port number for access to your email server. You can use ports, mentioned below: 25, 465, or 587
- Secure - select the type of secure. Possible values are None, SSl\TLS or STARTTLS
Note: the SSL/TLS is commonly used.
- Authorize type - select the authorize type. Possible values are Login, Plain and Crammd5
Note: the Login is commonly used.
Click Save. Now you’re allowed to test how it works. Press the Test Email Transport button in the upper right corner of the page. Please check if you’ve got the email.
If you’ve installed the Helpmate and Ask It extensions, you can check and use already added email sender. Using created transport, you are allowed to send email over SMTP, that easily handles sending.
Storage interface
Email extension provides the download of emails via Pop3 or IMAP protocol. This feature is used by our HelpMate extension. If you need more detailed information, please contact us. Also the Email extension allows you to keep all your emails in the storage. You can access and manage them anytime you need.
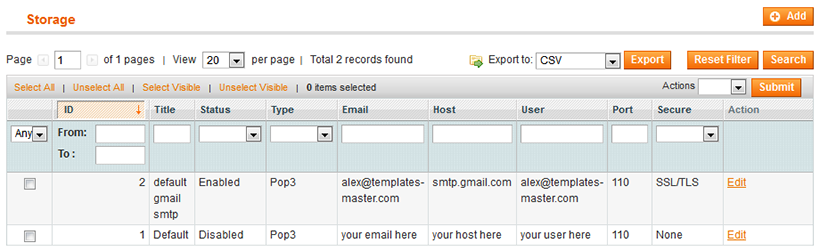
In order to configure the Storage settings, please use Transport interface sample. Be noticed, that there are two distinguishing features:
- In the Type field you can select POP3 and IMAP
- In the Port field specify the port number defined for Storage only. Be noticed, the port number is another one, that Transport port is.
Queue interface
In order to reduce server load, we recommend to use the Queue interface. We use a database table for queue implementation. For instance, if smtp server at the email client you’ve created an account on, can’t connect with the smtp server at address of your recipient, the messages will be generated and saved in queue. After the queues timeout ended, emails will be sent to your mail server using your email transport. Using it you can manage queue of emails that were sent.
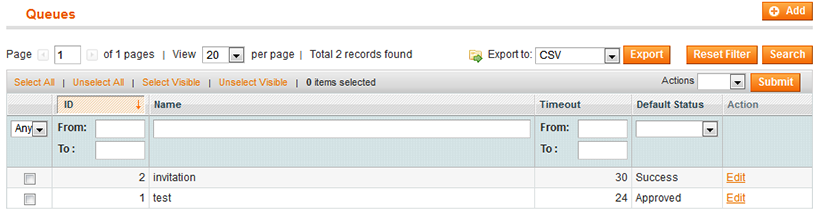
Please go Admin -> Templates-Master -> Email Queues and add or edit the created queue as follows:

- Name - provide a name for sent emails queue
- Timeout - specify the time in seconds to handle the timeout for emails queue sending
- Default Status - enable the queue
Transactionals emails interface
The other Email extension interface you can use, is Transactional Emails. Go Admin> Templates-Master> Email> Transactional Emails. When you select it, you will be redirected to Admin> System> Transactional Emails. Now you can modify the template of the email in order to perfect your emails' perception. The default magento interface is simple to configure and easy to work.
Use cases
How to configure Google Apps email to be used with our module
In order to configure Google Apps email to be used with our module, please go Admin> Templates-Master> Email> Email Gateways and choose Transport interface. There you can fill fields as mentioned below. Please notice, that in Email, User and Password fields you have to specify your personal data of personal Google account.
Support
Template Master team is always ready to assist you with any issue related to our products.
We do offer:
- Free commercial products installation services
- Free updates within offered support period
- 3 months of free guaranteed support
Our duties:
- Responsibility for resolving products bugs.
- Help with technical queries.
- Support of popular web browsers (Firefox, Chrome, Safari, Internet Explorer 7+).
- Technical support in installation and usage of our products.
Common questions and ideas
Come up with new ideas!
There are no product questions yet.