Fire Checkout 2.0 User Manual
CONTENTS
3. General configurable options
Adding comment fields to sales emails
Adding checkout fields to transactional emails
Using delivery date and time of the order
How to configure extension so it will reload order totals on different events
Changing URL of Fire Checkout page
Description
The Fire Checkout extension is one of the most powerfull modules created in order to increase Magento store sales. Checkout processes, that involve many tedious steps and confusing form elements for the customer, lead to increase of shopping cart abandonment and losing those customers. We know, that one of the easiest and best ways to help you keep your customers happy, is to provide them with a simple checkout form. When your visitors are able to place their orders quickly and without instance, your sales will immediately increase.
The extension includes three integrated modules:
- Checkout Success Page provides a display of all the details of your order after placing order and updating Fire Checkout page.
- Checkout Fields allows to add on Fire Checkout page up to 5 custom fields to display any information.
- Order Attachments will help you to attach files to the order
Fire Checkout provides full support for all payment and shipping methods, which means that there will be no core modification needed to install your new one-page checkout solution. Improve your store checkout process and increase your sales today with Fire Checkout. Apply less effort and get more customers. Start improving your store today and achieve an immediate increase in sales with FireCheckout, along with our wide variety of Magento templates, Magento themes and extensions here at Templates Master!

The Fire Checkout extension offers the following features:
- Configurable address form fields sort order
- Delivery date option
- Flexible AJAX updates for checkout page
- Improved overall performance over 30%
- Support users country and city auto-detect with geolocation technology!
- Use on multiple domains of same installation!
- Easy to control checkout fields
- Set default shipping and payment methods
- Update all checkout fields with Ajax request
- Easily manage required customer fields
- Supports Terms & Conditions form
- Skip shopping cart page
- Optional AJAX update
- Order comments placed in order email notification
- Backgrounds merged into single sprite image
- Coupon code support
- VAT verification for the Europe Union countries using VAT Information Exchange System (VIES)
- Supports UK Postcode Lookup / Address Finder by CraftyClicks
- Multi-store and multi-language support.
- Now available in 12 languages (English, Arabic, Chinese Simplified, Dutch, French, German, Italian, Japanese, Korean, Portuguese, Russian, Spanish, Swedish, Norwegian)
Installation
After downloading the magento extension please follow these instructions to proceed with the installation of your theme:
Turn your magento cache on:
Navigate to Admin -> System -> Manage Cache and activate cache for your store.
Turn store compilation off:
Navigate to Admin -> Tools -> Compilation and deactivate compilation mode for your store.
Copy all files into your magento directory:
Simply copy all files from "extension source x.x.x" directory into your magento store directory.
In case you have different then "default" default folder - rename folders
app/design/frontend/default/default and skin/frontend/default/default.
Turn your magento cache off:
Navigate to Admin -> System -> Manage Cache and deactivate cache for your store.
- Navigate to System > Configuration > Templates-Master > Fire Checkout and enable extension for any store you need.
- Configure Fire Checkout module according to your needs.
- That's all. Your clients can buy the products in the new convenient checkout module.
General configurable options
The Fire Checkout extension offers complete control over your checkout page from configuration panel. To set the following configuration, go to Admin> System>Configuration>Templates Master>Fire Checkout.
General
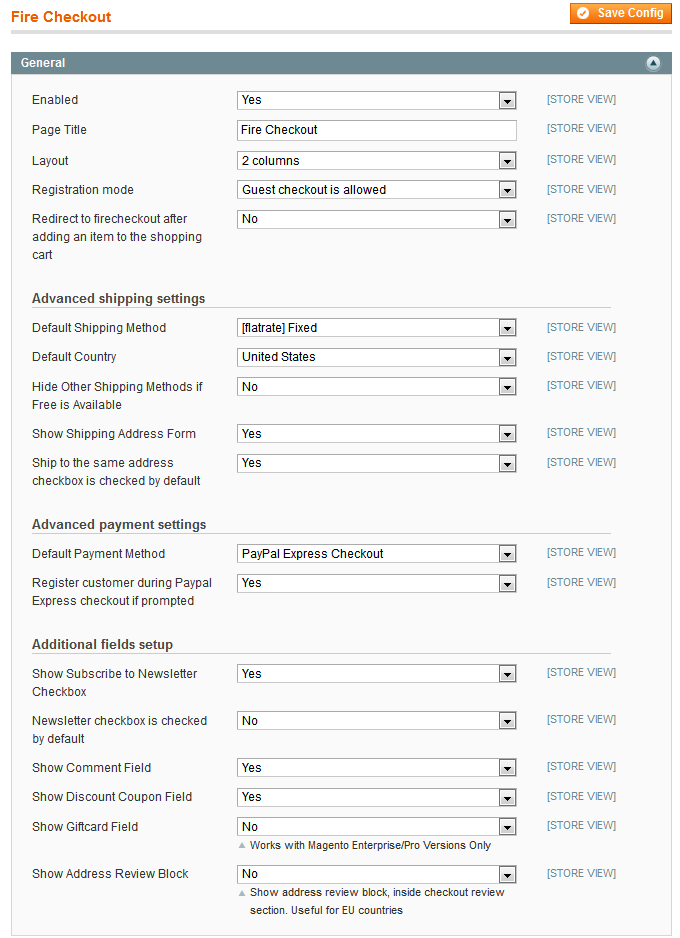
- Enabled - select Yes to enable the extension.
- Page Title - please specify the checkout page title.
- Layout - select two or three columns for your checkout page according to your requirements.
- Registration mode- select the registration mode. Possible values are : Guest checkout is allowed, Registration is required or User is registered during checkout without prompting a password.
- Redirect to Fire Checkout - If you select Yes after adding an item to the shopping cart field, the customer will be automatically redirected to Fire Checkout after adding an item to the shopping cart.
NOTE: at the root Magento redirects customers to the shopping cart after adding the item. This option allows you to redirect user directly to the Fire Checkout page.
- Default Shipping Method - specify the shipping method that was selected by default.
- Default Country - specify the country that was selected by default.
- Hide other shipping methods if Free shipping is available field - select Yes.
- Show Shipping Address Form - select Yes to enable the display of Shipping address field.
- Ship to the same address checkbox is checked by default - select Yes or No according to your requirements.
- Default Payment Method - specify the payment method that was selected by default.
- Register customer during Paypal Express checkout if prompted - if you select Yes,then Firecheckout will register customer if "Register during checkout" checkbox was checked by customer during checkout process.
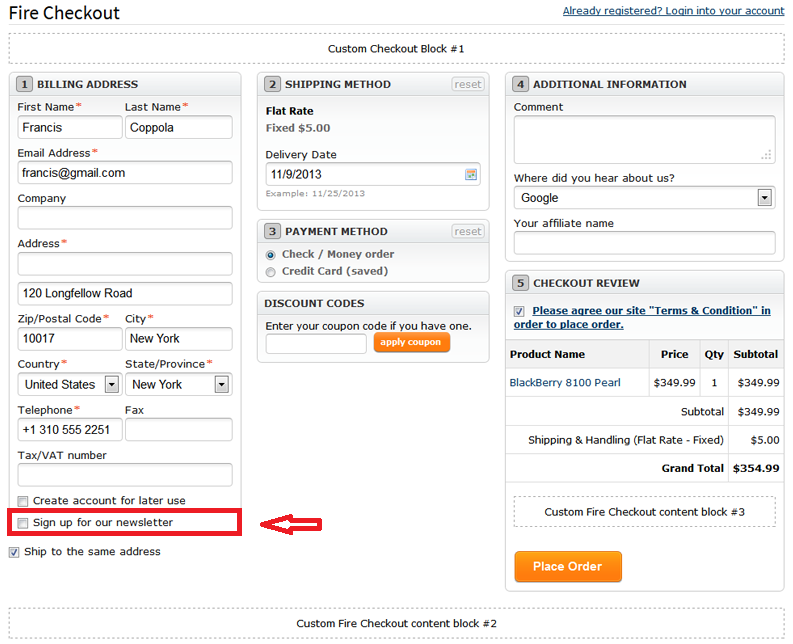
- Show Subscribe to Newsletter Checkbox - select Yes to enable the display of Subscribe to Newsletter Checkbox field.
- Show Comment Field - select Yes to allow customers leave their comments in the Show Comment field.
- Show Discount Coupon Field - select Yes to allow customers use the coupon code during checkout process.
- Show Gift card - select Yes to allow customers use gift cards during checkout process.
NOTE: works with Magento Enterprise/Pro Versions only
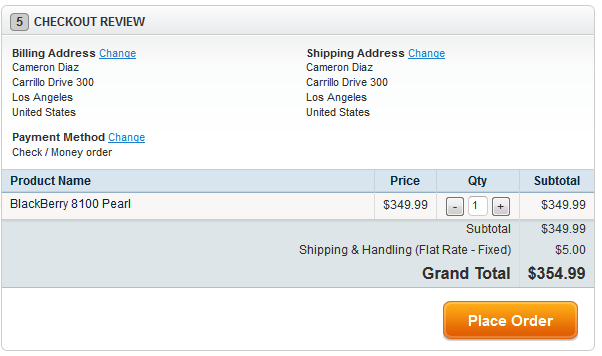
- Show Address Review Block - select Yes to enable the display of Address Review field inside checkout review sections.
NOTE: useful for EU countries
NOTE: By default in Magento creation of new account during Paypal Express checkout was disabled. Our extension offer additional programming logic that allows new customer to be registered using Paypal Express.
Additional content
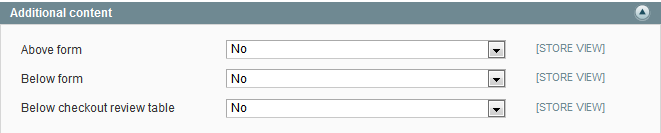
Please select Yes in the above, below or below checkout review table fields if you want to place fields there to display an additional information.
GeoIP
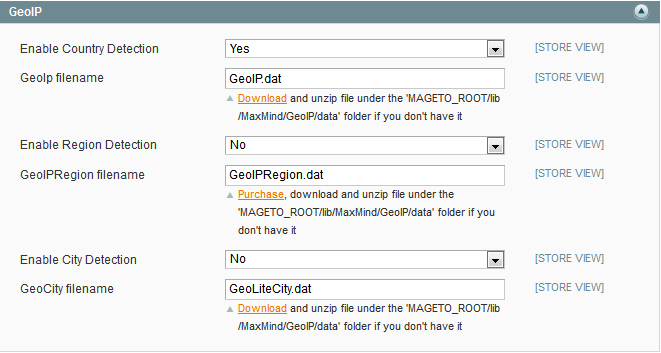
- Enable Country Detection - select Yes to enable the display of Country Detection field.
- GeoIp filename - please set .dat file. Downloadand unzip file under the 'MAGETO_ROOT/lib/MaxMind/GeoIP/data' folder if you don't have it.
- Enable Region Detection - select Yes to enable the display of Region Detection Field.
- GeoIp filename - please set .dat file. Purchase and unzip file under the 'MAGETO_ROOT/lib/MaxMind/GeoIP/data' folder if you don't have it.
- Enable City Detection - select Yes to enable the display of City Detection (including postcode) field.
- Geo City filename - please set .dat file. Downloadand unzip file under the 'MAGETO_ROOT/lib/MaxMind/GeoIP/data' folder if you don't have it.
Click on the links below to go to the site where that data can be downloaded.
http://geolite.maxmind.com/download/geoip/database/GeoLiteCountry/GeoIP.dat.gz- Country detection. Free to use.
http://www.maxmind.com/app/region- ZipCode and region detection - Client should buy the library, if he needs.
http://geolite.maxmind.com/download/geoip/database/GeoLiteCity.dat.gz- City detection. Free to use.
Address form fields
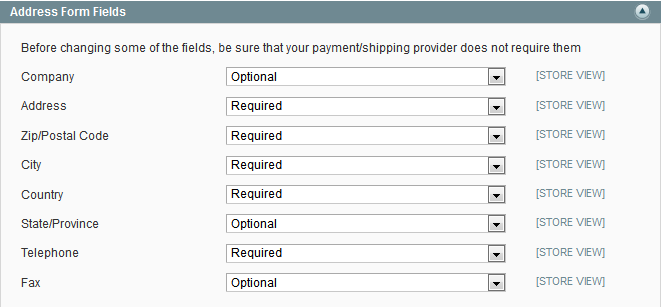
NOTE: before changing some of the fields , be sure that your payment/shipping provider does not require them.
Select possible values Required , Optional or Hidden from the drop-down list according to your needs.
Address form fields sort order
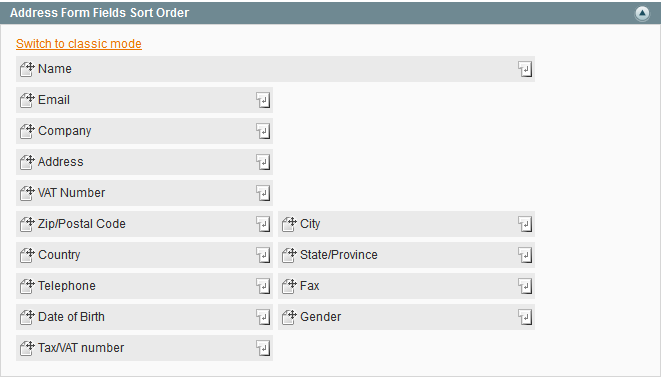
NOTE: to place the fields above in the one row, set their order values in continuous chain 1,2 or 12,13 or 20,21
To place fields in separate rows, break the order values chain 1,3 or 12,18 or 20,30
Ajax
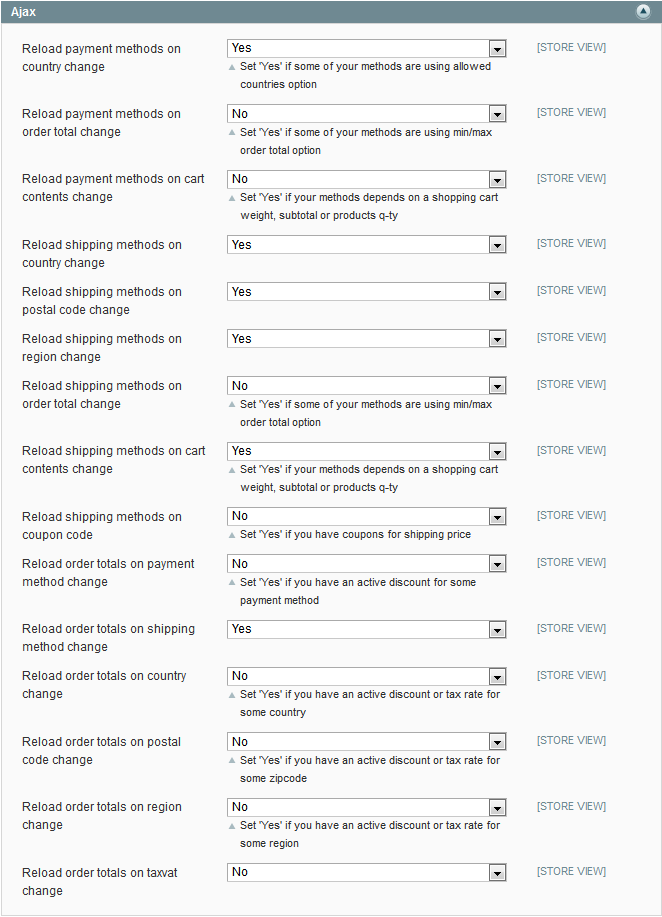
- Reload payment methods on country change - select No , if you don't use different payment methods for various countries.
- Reload payment methods on order total change - select Yes, if you need to reload payment methods while changing the order totals in the cart.
- Reload payment methods on cart contents change - select Yes , if you need to reload payment methods while changing the content of the cart (include products’ weight, subtotal and quantity).
- Reload shipping methods on country change - select No, if you don't use different shipping methods for various countries.
- Reload shipping methods on postal code change - select Yes , if you need to reload shipping methods while changing postal code.
- Reload shipping methods on region change - select Yes, if you need to reload shipping methods while changing region of country.
- Reload shipping methods on order total change - select Yes , if you need to reload shipping methods while changing the order totals in the cart.
- Reload shipping methods on cart contents change - select Yes , if you need to reload payment methods while changing the content of the cart (include products’ weight, subtotal and quantity).
- Reload order totals on country change - select Yes , if you need to reload order totals in the cart while changing the country.
- Reload order totals on postal code change - select Yes , if you need to reload order totals in the cart while changing the postal code.
- Reload order totals on region change - select Yes , if you need to reload order totals in the cart while changing the region.
- Reload order totals on taxvat change - select Yes , if you need to reload order totals in the cart while changing the taxvat.
NOTE: the order totals can be changed if you have an active discount or tax rate.
Terms and conditions

NOTE: Fire Checkout allows you to use lightbox like window , if you select Minimal.
Firecheckout on mobile devices

Tax/Vat number

- Validate tax vat number - select Yes to enable the validation of tax vat number
- Use online VIES validation - select Yes to enable the use of VIES validation online.
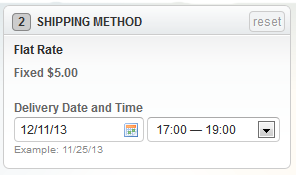
Delivery date and time
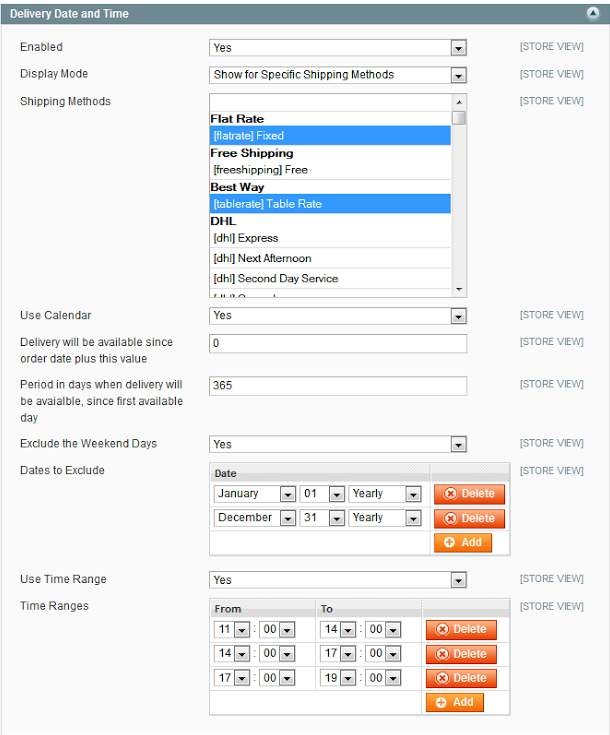
- Enabled - select Yes to enable the setting of delivery date and time.
- Display mode - select possible values Show for All Shipping Methods or Show for Specific Shipping methods to set the display mode.
- Use Calendar - select Yes to enable the use of calendar.
- Delivery will be available since order date plus this value - please specify the value according to your requirements.
- Period in days when delivery will be available, since first available day - please specify the period according to your requirements.
- Exclude the Weekend days - select No to disable the delivery on weekend.
- Dates to Exclude - please specify and add the days you wish to exclude the delivery.
- Use Time Range - select Yes to enable the time range when the delivery is available.
- Time Ranges - please specify and add the time ranges you wish to make the delivery available.
Shopping cart
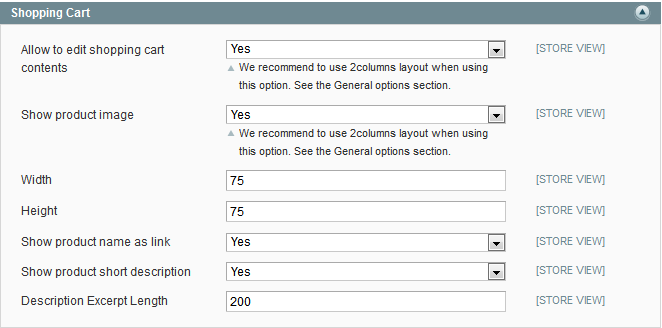
- Allow to edit shopping cart contents - select Yes if you want to make changes to shopping cart contents.
NOTE: we recommend to use 2 columns layout while using this option.
- Show product image - select Yes to enable the display product image.
- Width field - specify the the width of image.
- Height field - specify the the height of image.
- Show product name as link - select Yes to enable the display product name as a link.
- Show product short description - select Yes to enable the display of product description.
- Description Excerpt Length - specify the length of the description.
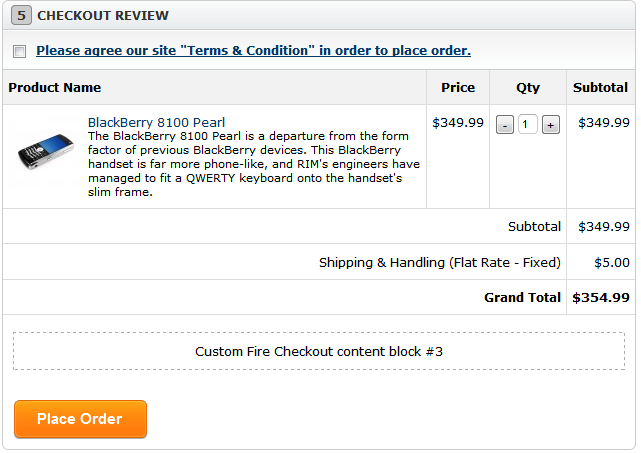

Checkout Success Page
After placing order the customer will get reminding with all order details. To configure this feature, please go to Admin> System>Configuration>Templates Master>Checkout Success Page.

- Enabled - select Yes to enable the extension.
- Show detailed information - select Yes to display the detailed order information after placing order.
- Select Yes or No in the Above order information and Below order information fields according to your requirements.

Checkout Fields
To configure the following settings, please go to Admin> System>Configuration>Templates Master>Checkout Fields.
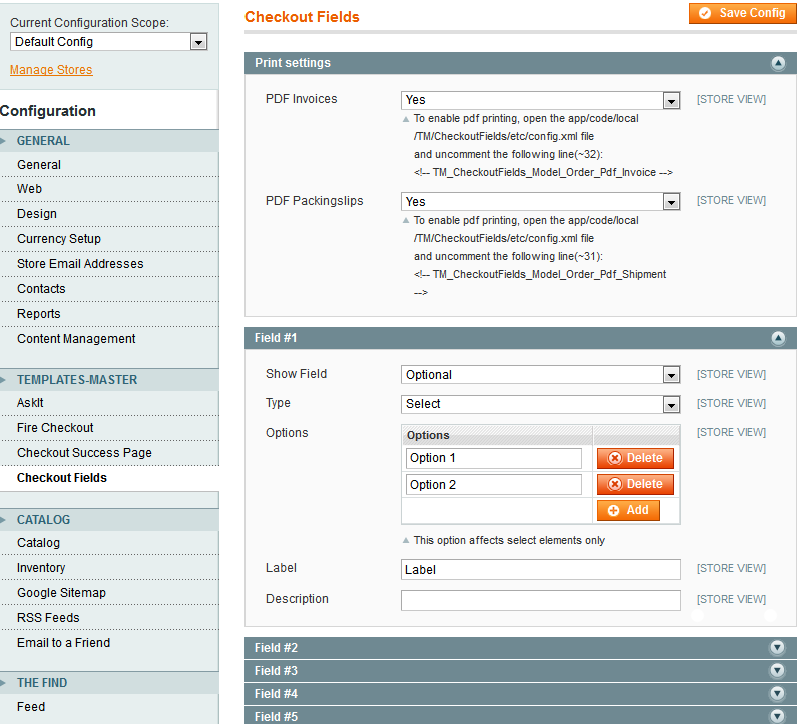
- PDF Invoices - select Yes to enable pdf invoice printing.
- PDF Packingslips - select Yes to enable pdf packingslips printing.
- Show field - select and specify the field status.
- Type - please define the type of the input field. If you specify Select, the field Options will be displayed.
- Label - please specify the name of the field.
- Description - now you are allowed to put additional description to newly created field.
NOTE: you are allowed to create up to 5 custom fields.
Advanced features
Using geolocation
To get start working with GeoIp features such as offering customers countries or cities on checkout page, go to Admin> System>Configuration>Templates Master>Fire Checkout.
Then do the following :
- In the Country field set
Downloadand unzip file under the 'MAGETO_ROOT/lib/MaxMind/GeoIP/data' folder if you don't have it
- In the City field set
Downloadand unzip file under the 'MAGETO_ROOT/lib/MaxMind/GeoIP/data' folder if you don't have it
Adding comment fields to sales emails
Fire Checkout alows customers to write comments to their orders. If you wish to send the comment in the order notification email, you have to edit email templates (New Order and New Order for Guest).
Go to Admin>System>Transactional emails and do the following:
- Click Add New Template
- At the Template field select New Order (New Order Guest) from the drop-down list
- Then press Load template button.
- Set the Template name field with "Fire Checkout New Order" for example.
- Set the Template Content field with the following code in the desired position. ( Before <p style="font-size:12px; line-height:16px; margin:0;">Your order confirmation is below. Thank you again for your business.</p> for example)
{{depend order.getFirecheckoutCustomerComment()}}
<p style="font-size:12px; line-height:16px; margin:0;" >Order Comment: {{htmlescape var=$order.getFirecheckoutCustomerComment()}}</p>
{{/depend}}
- Click Save Template.
Repeat same steps in order to create email template for guests orders.
Then navigate to Admin>System>Configuration>Sales>Sales Email>Order
- In the New Order Confirmation Template and "New Order Confirmation Template for Guest" and add same code block.
- Click Save Config.
Adding checkout fields to transactional emails
Go to Admin>System>Transactional emails and do the following:
- Click Add New Template.
- At the Template field select New Order for Guest from the drop-down list.
- Then press Load Template button.
- Set the Template name field with My "New Order Guest" for example.
- Set the Template Content field with the following code in the desired position:
{{depend order.getData('tm_field1')}} <p style="font-size:12px; line-height:16px; margin:0;">Field #1: {{htmlescape var=$order.getData('tm_field1')}}</p> {{/depend}}
{{depend order.getData('tm_field2')}} <p style="font-size:12px; line-height:16px; margin:0;">Field #2: {{htmlescape var=$order.getData('tm_field2')}}</p> {{/depend}}
{{depend order.getData('tm_field3')}} <p style="font-size:12px; line-height:16px; margin:0;">Field #3: {{htmlescape var=$order.getData('tm_field3')}}</p> {{/depend}}
{{depend order.getData('tm_field4')}} <p style="font-size:12px; line-height:16px; margin:0;">Field #4: {{htmlescape var=$order.getData('tm_field4')}}</p> {{/depend}}
{{depend order.getData('tm_field5')}} <p style="font-size:12px; line-height:16px; margin:0;">Field #5: {{htmlescape var=$order.getData('tm_field5')}}</p> {{/depend}}
- Click save Template.
Do the same operations in order to create template for registered customers.
Then navigate to Admin>S ystem>Configuration>Sales>Sales Email>Order
- At the New Order Confirmation Template and New Order Confirmation Template for Guest and add same code.
- Click Save Config.

Repeat this operation for other order email templates if you wish (invoice, shipment, etc).
Attaching files to the order
Our extension comes with Order Attachments module created for Magento that will allow you to attach files to the order. It will also help you to include attachment links to the email template. All attached files are protected from public access and are accessible via private generated links only.Features
- Completely secure. No direct links to uploaded files. Attachments are protected from public access with generated links.
- Super fast. The file upload is powered by ajax technology and does not require the whole page reload.
- Fully customizable. You can use the following configuration to filter uploaded files: Allowed file extensions, Max file size, Max file count.
- Extendable. The module provides you with convinient methods to get order's attachments from any third-party module.
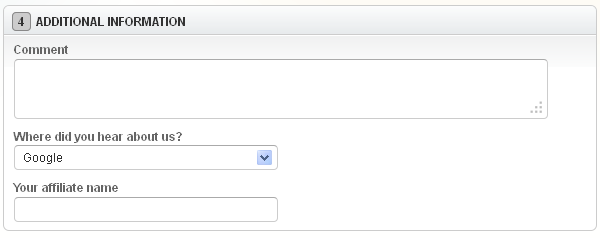
Frontend
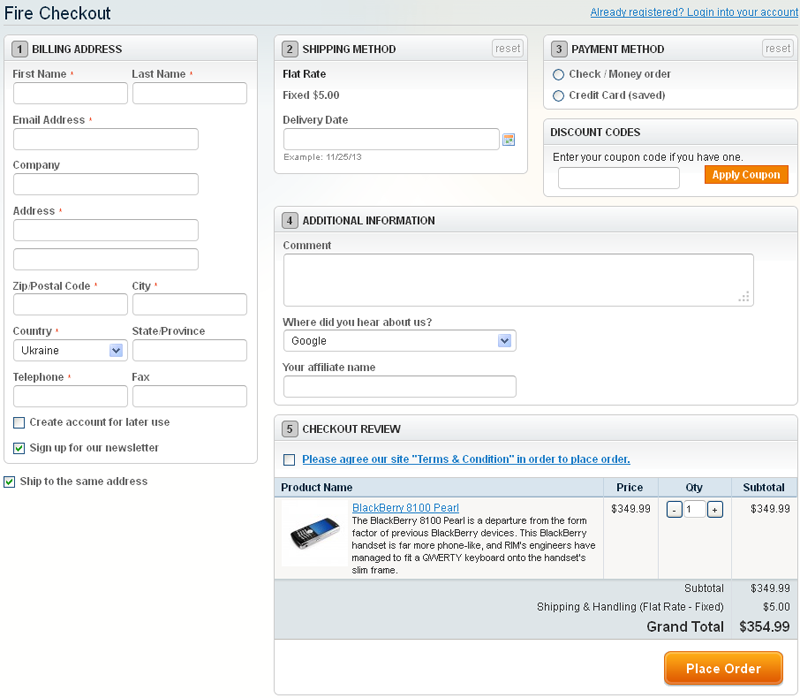
Firecheckout
Module is rendered in additional information section and shows the list of allowed file extensions to make upload process more friendly.

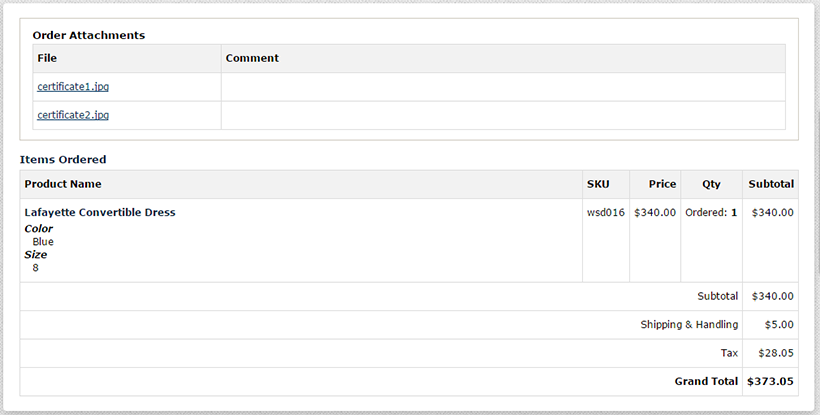
Order view page
Attachments are visible on the Guest Order View and on Customer Order View pages.
Email integration
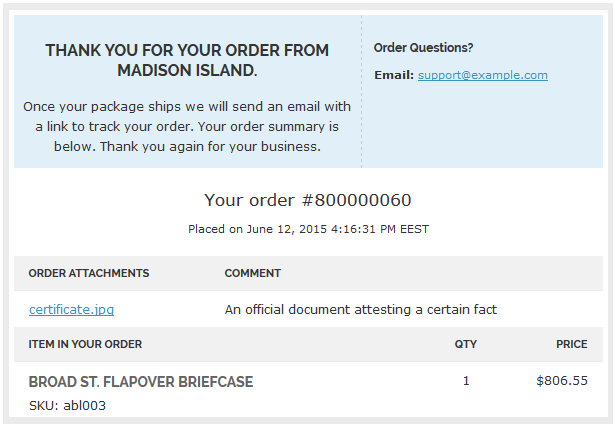
You can add the attachment links to the email template using the following code:
{{block type='orderattachment/view' area='frontend' template='tm/orderattachment/email/view.phtml' order=$order}}
There are two built-in email templates available: html and txt.
tm/orderattachment/email/view.phtml
tm/orderattachment/email/view.txt.phtml
Backend
Configuration
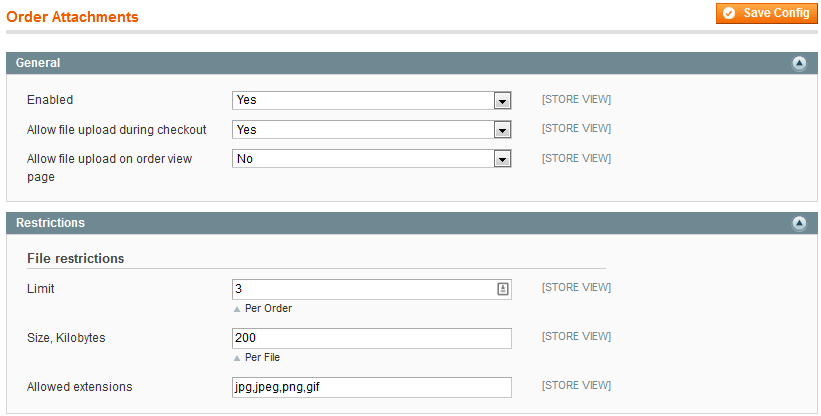
- In the Enabled field you are allowed to enable or disable the module.
- In the Allow file upload during checkout select Yes to allow users attach files on the checkout page.
- In the Allow file upload on order view page select Yes to allow users attach files on the order view page.
- In the Limit field please specify the Files count limit per one order.
- In the Size field specify the file size in kilobytesto be attached.
- In the Allowed extensions field specify the allowed file extensions list comma separated.
Order attachments page
The page is located at Templates Master > Order Attachments. It allows you to search, edit, download or remove attachments.

It also has two buttons on the top of the page:
- The Clear lost attachments button will clear attachments with empty order and quote ids. Lost attachments can appear after database cleanup.
- The Clear old guest attachments button removes attachments from guest carts which are inactive for more than two days.
- You are not required to run these cleanups manually. The module runs cleaners automatically with cron setup.
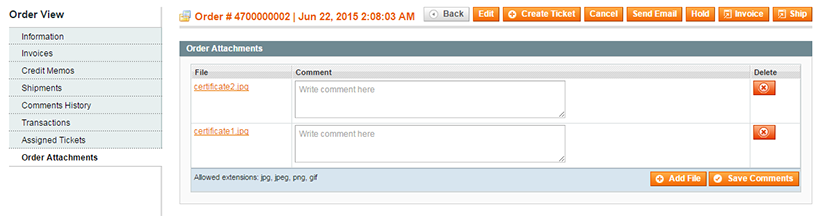
Order edit page
Module is integrated into separate tab of the order edit page. You can edit attachment comments, upload new attachments or delete them.
Custom usage
The Order Attachments module will help you to get attachments programatically. It provides easy-to-use public methods which can be used by third-party modules or custom blocks.
	$helper = Mage::helper('orderattachment');
	$attachments = $helper->getAttachmentsByOrderId($orderId);
	foreach ($attachments as $attachment) {
    echo $attachment->getFilename();
    echo $this->escapeHtml($attachment->getComment());
    echo $attachment->getDownloadUrl();
	}
Using delivery date and time of the order
Fire Checkout extension allows you to specify a date and time of delivery of the order. If you wish to send this information in the order notification email, you need to edit the email templates (New Order and New Order for Guest).
Go to Admin>System>Transactional emails and follow the steps described above.
NOTE: fill the Template Content field with the following code in the desired position:
{{depend order.getFirecheckoutDeliveryDate()}}
 <p style="font-size:12px; line-height:16px; margin:0;">Delivery Date: {{htmlescape var=$order.getFirecheckoutDeliveryDate()}}</p>
{{/depend}}
{{depend order.getFirecheckoutDeliveryTimerange()}}
 <p style="font-size:12px; line-height:16px; margin:0;">Delivery Time: {{htmlescape var=$order.getFirecheckoutDeliveryTimerange()}}</p>
{{/depend}}
Different layout type
Our extension comes with 2 fluid and orignal layouts for checkout page. You can use either 2 columns or 3 columns layour. Therefore we do recommend to use two-column layout type.
To set different layout type , go to Admin>System>Configuration>Templates Master>Fire Checkout and do the following at General:
- In the Layout field select 2 columns
- Click Save Config.

If you wish to use three-column layout type, go to Admin>System>Configuration>Templates Master>Fire Checkout and do the following at General:
- In the Layout field select 3 columns.
- Click Save Config.
How to configure extension so it will reload order totals on different events
The order totals you reload will be always automatically re-counted while changing region or postal code. To set this feature, go to Admin>System>Configuration>Templates Master>Fire Checkout and at Ajax do the following:
- In the Reload order totals on postal code change field select Yes.
- In the Reload order totals on region change select Yes.
Changing URL of Fire Checkout page
Firecheckout extension URL can be easily changed by completing next steps:
- Click the link.
- Open app\code\local\TM\Firecheckout\etc\config.xml.
- Replace the frontname parameter firecheckout to any new on the following rows Fire Checkout_index(#84) and frontName(#91).
- The new parameter that you set will be used as an URL to Fire Checkout page.
Compatible modules list
Fire Checkout extension supports most popular payment and shipping modules.
| Payment methods | Paypal, Saved CC, Check / Money Order, Purchase Order, Authorize.net, Paybox System, Paybox Direct, Protx Standard, eWAY, ChronoPay, Cybermut, iDEAL, Ogone, Authorize, SecurePay, Cash on Delivery, ePay service , Ebizmarts Sage Pay, Klarna,Payone, Phoenix Ipayment,Radweb_Stripe,Customweb_PayUnity,Braintree. |
|---|---|
| Shipping methods | PostcodeNl_Api,SmartPost,Magestore_Storepickup,Table Rate, Flat Rate, Free Shipping, TNT, Fedex, DHL, UPS, USPS, Owebia Shipping, Meanbee Royal Mail, Store Pickup, Relaypoint. |
| Other methods | Aitoc_Aitgiftwrap,MageWorx_CustomerCredit. |
| Modules by third-part developers | AW_Newsletter, Billpay, Bysoft_Relaypoint, CraftyClicks, Ebizmarts_SagePaySuite, Enterprise_Enterprise, GCMC_GiveChange, Geissweb_Euvatgrouper, IntellectLabs_Stripe, IrvineSystems_Deliverydate, IrvineSystems_JapanPost, IrvineSystems_Sagawa, IrvineSystems_Seino, IrvineSystems_Yamato, Kiala_LocateAndSelect, Klarna_KlarnaPaymentModule ,Mage_Captcha, Magestore_Storepickup, MageWorx_MultiFees, Netresearch_OPS, Payone_Core, Phoenix_Ipayment, Rewardpoints // J2t Rewardpoints, Symmetrics_Buyerprotect, TIG_Postcode, Webtex_Gitcards. |
Fire Checkout extension supports most popular payment and shipping modules.
Troubleshooting
To isolate the source of a problem and fix it, you can use ready-made answers. Troubleshooting section is based on FAQ. Please go the links if you want to get an answer.All articles
Support
Template Master team is always ready to assist you with any issue related to our products.
We do offer:
- Free commercial products installation services
- Free updates within offered support period
- 3 months of free guaranteed support
Our duties:
- Responsibility for resolving products bugs.
- Help with technical queries.
- Support of popular web browsers (Firefox, Chrome, Safari, Internet Explorer 7+).
- Technical support in installation and usage of our products.
Common questions and ideas
Come up with new idea!Questions:
-
0voteA: Please open ticket at https://templates-master.com/contacts and our developers will check what is wrong.Posted by on Friday, October 5, 2018
-
0voteA: It should be visible from admin interface. In case you want to add it to sales email please check http://docs.swissuplabs.com/m1/extensions/firecheckout/adding-comment-fields-to-sales-emails/Posted by on Monday, March 12, 2018
-
0voteA: It should be visible directly on your admin interface. In order to check how to add this to email please check http://docs.swissuplabs.com/m1/extensions/firecheckout/adding-checkout-fields-to-transactional-emails/Posted by on Thursday, March 8, 2018
-
0voteA: If you already have an ability to add additional field onto this grid, then you can use the same approach to show our fields (Just look how they are named in the sales_flat_order table). Otherwise, we don't provide such ability.Posted by on Monday, January 23, 2017
-
0voteA: Please contact our support at http://templates-master.com/contacts/ so they can check that issue. It should not work like that.Posted by on Friday, December 16, 2016
-
0voteA: This may happen if you are using Firegento_Magesetup module.It replaces standard agreements block with it's own with different functionality.Otherwise, please send ftp details, so I could look what happens.Posted by on Wednesday, November 23, 2016
-
0voteA: Hi, Fire Checkout works with bundle products without any problem. Please check if your default checkout works with bundle products. Most likely there is problem with bundle product configuration or some other module conflict;.Posted by on Thursday, October 6, 2016
-
0voteA: Please open ticket at our helpdesk and our developers will check what is wrong.Posted by on Thursday, October 6, 2016
-
-1voteA: Hi,sorry do you want to change position of that field for checkout page on fronend or change it's position for admin order interface?Posted by on Wednesday, September 21, 2016